Exercises (3159)
Tchoukball: Tchouk-Basket
Forms of play / exercises
2 Teams
Try out different ball trajectories and adjust the defence. In this exercise, the participants play towards the basket instead of the frame.
In order to score, the attackers must hit the basketball hoop so that the ball then falls to the ground. The defenders try to catch the ball before it touches the floor. Same rules as in the normal game (no obstruction), but catching the ball is allowed. Depending on the level, more than three passes are allowed.
Note: Once a point has been scored, the ball belongs to the other team and must cross the centre of the court before another attack (on one or the other basket).
Pitch:
1 handball
5-7 game wristbands / covers
Tchoukball: Magic ball
Forms of play / exercises
Group work
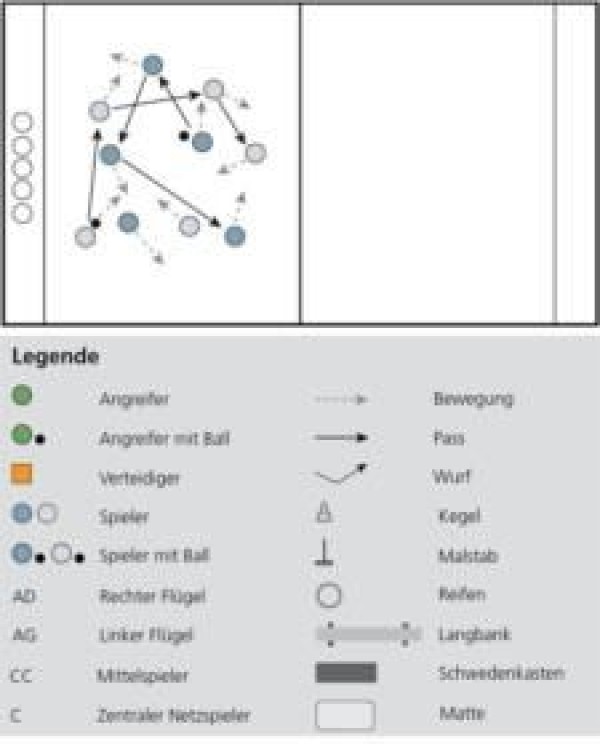
The aim of this exercise is to execute quick passes across the forbidden zone in order to move the defence sideways.
Player A passes to B, who receives the ball on the run, jumps across the forbidden zone and passes to C, also on the run. C now throws to D, who takes a jump shot.
Note: First practise without running to understand the process, then in competition form with the defenders. How many points can be scored from six attacks?
Aim: High intensity; increase the load
Per pitch:
1 handball
2 Tchoukball frames
Tchoukball: passes of ten
Forms of play / exercises
3 teams of 7 players each
Form three teams of seven players each on a half court, one of which waits outside the court.
The other two teams each have a ball, move freely around the court and pass ten consecutive passes to each other according to the rules for tchoukball (no more than two steps with the ball, do not drop the ball on the ground, no obstruction, etc.).
The team that succeeds in this is awarded a point. If a team misses a pass or makes ten consecutive passes, it clears the field in favour of the waiting team.
Which of the three teams is the first to score five points?
Objective: free running, accurate passing, cover work, anticipation.
Pitch:
14 playing ribbons / covers
2 handballs
Sense of speed
Basic training
In (small) groups according to running speed or individually
The instructor sets a time limit in which a given circuit (e.g. athletics track) must be completed. When the time is up, this is signalled by the leader. The instructor positions themselves at the start/finish point accordingly. Participants (or groups) who have not yet completed the lap at this point must increase their pace for the next lap. Participants who have already crossed the start/finish line at this point must slow down their pace for the next lap. To make the exercise interesting for all participants, different times/targets are defined for different strength groups.
Course: circuit
Intensity level: 3 (medium)
HFmax: 80-90%
Speech rule: speak in complete sentences
Variant:
The participants can determine the distance they have to cover in the specified time themselves.
1 stopwatch
1 signalling device (e.g. hand whistle)
FTA evaluation (group formation)
Tennis: cooperative forms of play
Forms of play / exercises
Playing together with simple forms of play:
Player 1 throws the ball to player 2, who hits the ball back so that player 1 can catch the ball.
Play the ball back and forth, stopping the ball before returning it (control shot).
Play the ball back and forth 10 times without making a mistake (vary the distance).
Player 1 hits the ball crosswise (diagonally), player 2 hits the ball longline (straight).
Play the ball back and forth 3 times without making any mistakes, then play the point freely (score the point).
Per participant:
1 tennis racket
x tennis balls
Tennis: a cooperative game on a small court
Forms of play / exercises
Playing together to make progress (beginners):
Stop and continue playing:
Stop the ball with your forehand, bounce it on the ground and return it.
Stop the ball with your backhand, bounce it on the ground and return it.
Stop the ball with your forehand, bounce it on the ground and return it with your backhand, or vice versa.
Stop the ball with the forehand, return it directly from the air.
Stop the ball with the backhand, return it directly from the air.
Stop the ball with the forehand, return it directly from the air with the backhand, or vice versa.
Stop the ball directly from the air with the forehand and also return it directly from the air.
Stop the ball directly from the air with the backhand and also return it directly from the air.
Stop the ball directly from the air with the forehand and also return it directly from the air with the backhand, or vice versa.
Playing in with tasks:
Play the ball back and forth, throwing a second ball back and forth at the same time.
Play the ball back and forth, picking up a ball from the ground after each stroke and putting it down again.
Play the ball back and forth, but first stop the ball with your free hand before returning it with the racket.
Per participant:
1 tennis racket
x tennis balls
Tennis: eye-hand coordination
Forms of play / exercises
For beginners in tennis, exercises for eye-hand coordination are of great importance; for example, to be able to judge the balls correctly, to handle the balls or to promote dexterity in general. Here are some exercises that can be done with the tennis ball:
On the move:
Throw and catch the ball with one hand (train both sides).
Throw and catch 2 balls at the same time.
Throw 2 balls at the same time: Throw ball 2 to the left and catch it with the right hand, throw ball 2 to the right and catch it with the left hand.
Throw 2 balls up at the same time so that they meet in the air and catch them again.
Throw the ball up, touch it with any part of your body (e.g. foot, knee, head) and catch it again.
Throw 2 balls up and catch them with your hands crossed.
Throw the ball up, perform an exercise (e.g. 360-degree turn) and catch it again.
Bounce the ball with one hand (train both sides - also alternate between left and right bouncing).
Bounce 2 balls at the same time.
Bounce the ball, occasionally play the ball upwards with your foot, continue bouncing.
With partner (integrate small sideways shifts):
Players 1 and 2 throw a ball to each other at the same time and catch their partner's pass (both sides train).
Players 1 and 2 throw 2 balls to each other at the same time and catch their partner's passes. If necessary, drop the balls crosswise.
Players 1 and 2 pass a ball to each other at the same time and catch their partner's pass, passing one ball on the ground and the other ball directly in the air.
Players 1 and 2 pass 2 balls to each other at the same time and catch their partner's pass, passing one ball on the ground and the other ball directly in the air.
Per participant:
1-2 tennis balls
Tennis: coordination with racket and ball
Forms of play / exercises
Simple coordination exercises with racket and ball are suitable for tennis beginners:
Balance the ball on the racket (in motion).
Balance the ball at eye level on the racket (in motion).
Push the ball up from the bottom to the top with the forehand face of the racket.
Push the ball up from the bottom to the top with the backhand face of the racket.
Push the ball up from the bottom to the top alternately with the forehand and backhand faces of the racket. After each pass (forehand/backhand), optionally play the ball upwards once with your free hand.
Bounce the ball upwards with the forehand face of the racket (without the ball hitting the ground).
Bounce the ball upwards with the backhand face of the racket (without the ball hitting the ground).
Bounce the ball upwards alternately with the forehand and backhand faces of the racket (without the ball hitting the ground).
Bounce the ball upwards twice with the racket, let the ball hit the ground and bounce it upwards twice again.
Bounce the ball upwards with the racket, after a few touches try to play the ball upwards with the frame.
Bounce the ball downwards (in motion - always keep the racket above the ball).
With partner:
Player 1 plays the ball upwards, the next ball is played upwards by the partner.
Player 1 plays the ball upwards, the partner lets the ball hit the ground before playing the ball upwards.
Player 1 bounces the ball, the next ball is bounced by the partner.
2 players pass the ball to each other along a line, but the ball is first caught with the free hand before being returned. In the first phase, let the ball hit the ground and pass it back, then pass the ball directly from the air to your partner.
2 players pass the ball to each other along a line (forehand/backhand/alternating forehand and backhand).
Per participant:
1 tennis racket
1 tennis ball
Tennis: technique training
Forms of play / exercises
Exercises with a throw-off or lead-off by the leader are suitable for technical aspects of training.
Teaching the forehand and backhand technique:
Exercise 1: the player drops balls and the leader holds the player's racket, so the player has to take a high loop, swing under the leader's racket and hit the ball to the other side.
Exercise 2: as above, but the leader leaves the racket as an aid and drops the balls again.
Exercise 3: the leader passes balls to the player, who must perform the same stroke sequence from the movement to the ball.
Exercise 4: the leader plays from the opposite side with the racket and the player performs the same stroke sequence (further distance).
Per participant:
1 tennis racket
x tennis balls
Test form
Interval training
Individual work
The participants are independently responsible for the evaluation of their test!
Exercise duration: 2 minutes
Pause: 2 minutes and 30 seconds
Repeats: 4 times
Intensity level: 4 (hard)
Max HR: 90-95%
Rule of speech: brief exchange of words
In this type of test, it is important that the participants try to cover the same distance in the specified time for each interval.
The test form can be carried out as follows:
- Round track: To ensure that the participants have enough space available for the run, they can be spread out on the round track at the start. The load starts from the same starting point for each individual runner for each repetition. During the breaks, the participants return to their starting point. This allows participants to check/calculate the distance travelled after each interval. The sports director has all participants in view and can therefore start or stop the intervals with a signal.
- Distance of at least 700 metres: Distances are marked with signs (every 25-50 metres). Each participant receives a stop/pulse watch, runs the course independently and memorises the distance covered (it is possible to stagger the start of the participants). After the break time has elapsed, the participants run the distance they ran back to the starting point. During the breaks, the participants wait in place or continue running at a relaxed trot, but return to the starting point in good time (end of the previous interval). If the course allows, the sports director can give the start/stop signal for all participants (no staggering possible).
Variant: If you only have a short course available, you must turn around at the end of the course and continue running in the opposite direction until the end of the load time. At the next interval, the participants run the distance they ran earlier in the opposite direction back to the starting point. - Longer-distance circuit: The distances are marked with signs (every 25-50 metres). Each participant receives a stop/pulse watch, runs the course independently and calculates the distance travelled (no staggered start of the participants necessary). During the breaks, the participants wait in place or continue running at a relaxed trot until the end of the break time. For each interval, the participants must calculate the distance travelled based on the start/end point of the interval. After the last interval, all runners return to the starting point, which takes additional time.
After each interval, participants either have the option of writing down the distance covered (writing materials available on the track or on Mann) or memorising the four distances to write them down at the end of the test. The distances covered per interval are noted and totalled.
To evaluate the test, the distances covered for the four intervals are totalled. The result is noted down and can be compared with the next test. It is also worth dividing the result by the number of intervals (4) so that you have a comparative value for the individual intervals for the next test.
Distance markers (signs with metres)
1 signalling device (e.g. whistle)
For each participant:
1 heart rate monitor
For the sports director or each participant:
1 stopwatch
Writing materials and notepad
TicTacToe relay
Increase pulse
Group work
2 groups of 4-5 participants each
Change the order of participants after each round
The hoops are placed on the ground at a certain distance (approx. 10-15 metres) in front of the two groups in a square (3x3). Each group has three bibs, which they can distribute in the hoops. One bib may be carried per run. If a group manages to distribute the bibs in a row (horizontally, vertically or diagonally) in the hoops, they win the game. If a group has placed the three bibs in the hoops but the game has not yet been decided, the next runner can move a bib that is already in place to continue the game and, if necessary, decide in their favour.
Pitch:
9 hoops (optional: 4 ropes to mark the pitches)
Per group:
3 bibs (or 3 identical items such as IVP, bag knife)
1 hat
TicTacToe relay
Increase pulse
Group work
2 groups of 4-5 participants each
Change the order of participants after each round
The hoops are placed on the ground at a certain distance (approx. 10-15 metres) in front of the two groups in a square (3x3). Each group has three balls, which they can distribute into the hoops. One ball may be carried per run (carrying the ball in the hands, bouncing it or guiding it with the foot, balancing the ball/shuttle on the stick, guiding the ball with the stick). If a group manages to distribute the balls in a row (horizontally, vertically or diagonally) in the hoop, they win the game. If a group has deposited the three balls in the hoops but the game has not yet been decided, the next runner can move a ball that is already in the hoop to continue the game and, if necessary, decide in their favour.
Pitch:
9 hoops (optional: 4 ropes to mark the pitches)
Per group:
1 cone
1 ball ►baseball, futsal/football, handball, FooBaSKILL, volleyball
1 stick ►unihockey, intercrosse/lacrosse, Nordic walking
1 racket ►badminton/speedminton, smolball
TicTacToe relay
Forms of play / exercises
Group work
2 groups of 4-5 participants each
Change the order of participants after each round
The hoops are placed on the ground at a certain distance (approx. 10-15 metres) in front of the two groups in a square (3x3). Each group has three bibs, which they can distribute in the hoops. One bib may be carried per run. If a group manages to distribute the bibs in a row (horizontally, vertically or diagonally) in the hoops, they win the game. If a group has deposited the three bibs in the hoops, but the game has not yet been decided, the next runner can move a bib (of their own colour) that is already in place to continue the game and possibly win it.
Pitch:
9 hoops (optional: 4 ropes to mark the pitches)
Per group:
3 bibs (or 3 identical items such as marking hats, IVP, bag knife)
1 colouring stick
Tiger ball
Stimulate circulation
Group work
5-8 participants per group
In a limited playing field, the game is played 4:1, 5:1, 5:2 or 6:2, for example. The "tiger" in the centre chases the ball/throwing disc, while the outside players pass the ball/throwing disc to each other (with their hands, feet or playing equipment, depending on the type of game). If the "tiger" touches the ball/throwing disc or an outfield player makes a mistake (e.g. ball/throwing disc leaves the playing field or falls to the ground after a pass), the roles of the "tiger" and the person responsible for the mistake are swapped.
Per participant:
1 bat/stick ►smolball, floorball, intercrosse/lacrosse
1 ball/throwing disc (frisbee) ►basketball, blitzball/rugby/football, FooBaSKILL, futsal/football, handball, intercrosse/lacrosse, smolball, floorball, Frisbee Ulitmate
4 marking cones/caps ►field markings
Table tennis: Game
Forms of play / exercises
Group work
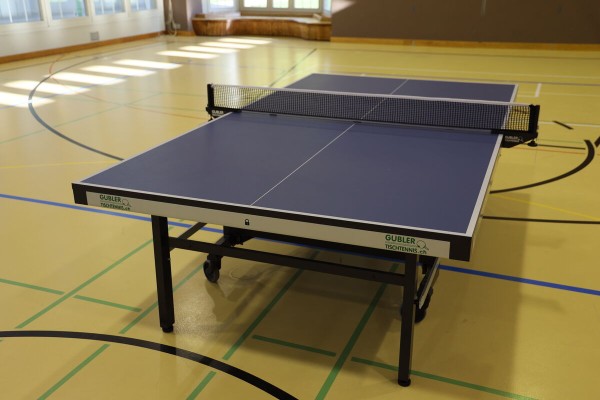
Single (group of 2) or double game (group of 4) to a winning set (11 points). If the group size is uneven (e.g. 3 participants), one player enjoys a break, whereby the set duration is reduced to 7 points to shorten the waiting times.
Additional strengthening task:
After each set, the loser completes a strength exercise: 5x squat plus jump squat
1 table tennis table
2-4 table tennis bats
x table tennis balls
Goalball
Increase pulse
Group work
2 teams
Two teams play against each other on a limited playing field. Several goals are set up using markers (e.g. colouring sticks, marker cones or cones) (ideally more goals than opponents). The team with the ball tries to pass the ball between the goals as often as possible (double passes are not allowed to score goals). The ball must be caught/received by a team-mate behind the goal. If the opposing team captures the ball, they can try to score goals.
16 colouring sticks
1 handball
x bibs
Goalball
Increase pulse
Group work
2 teams
Two teams play against each other on a limited playing field. Several goals are set up using markers (e.g. colouring sticks, marker cones or cones) (ideally more goals than opponents). The team with the ball tries to pass the ball between the goals as often as possible (double passes are not allowed to score goals). The ball must be received behind the goal by a team-mate with a floorball stick. If the opposing team captures the ball, they can try to score goals.
16 colouring sticks
1 floorball
x bibs
Participant:
1 floorball stick
Goalball
Increase pulse
Group work
2 teams
Two teams play against each other on a limited playing field. Several goals are set up using markers (e.g. colouring sticks, marker cones or cones) (ideally more goals than opponents). The team with the ball tries to pass the ball between the goals as often as possible (double passes are not allowed to score goals). The ball must be caught/received by a team-mate behind the goal. If the opposing team captures the ball, they can try to score goals.
The following rules apply to the game form:
- The ball, which is balanced on the stick, may be carried a maximum of 4 steps and must then be passed immediately.
- The ball may be touched a maximum of 4 times before it is played on.
- The ball at rest on the stick, without movement of the player, may be held for a maximum of 4 seconds.
- The ball may not be covered with the racket or the body, but must be played on immediately.
- It is not permitted to actively play the ball with the foot or lower leg, with the hand, the arm or the head (free hit).
If the ball leaves the playing field, it is brought back into play by a free hit by the opposing team at the place of action.
16 colouring sticks
1 smolball
x bibs
Per participant:
1 smolball bat
Torfrisbee
Increase pulse
Group work
2 teams
Two teams play against each other on a limited playing field. Several goals are set up using markers (e.g. colouring sticks, marking cones or cones) (ideally more goals than opponents). The team with the frisbee tries to pass the disc between the goals as often as possible (double passes are not allowed to score goals). The frisbee must be caught by a team-mate behind the goal. If the opposing team captures the frisbee, they can try to score goals.
16 colouring sticks
1 frisbee
x bibs
Transport relay
Increase pulse
Group work
4-6 participants per group
Each group receives two small mats. The group must now cover a certain distance without touching the floor. In other words, the whole group stands on one mat and the person at the back of the group passes the free mat to the front. The free mat is placed in front of the mat occupied by the participants so that all participants can move onto it without touching the floor. The free mat is then moved forwards.
The group moves in this way until it reaches the turning point (both mats have passed the colouring stick). If a participant touches the ground on the way, the whole group must return to the starting point and start the course all over again. If the course is successfully completed, one person is transported on the mat on the way back.
It is important to remember that the second mat must also be transported back to the start; the group can transport one person on both mats or the second mat can be carried back separately.
The relay form is repeated until every participant in the group has been transported once on a mat (or define a certain number of participants for the transport due to the time conditions).
In the field, committee tents can be used instead of mats.
Per group:
2 painting sticks
2 soft mats (small)
In the grounds:
2 committee tents
Tunnelball
Stimulate circulation
Group work
6-8 participants per group
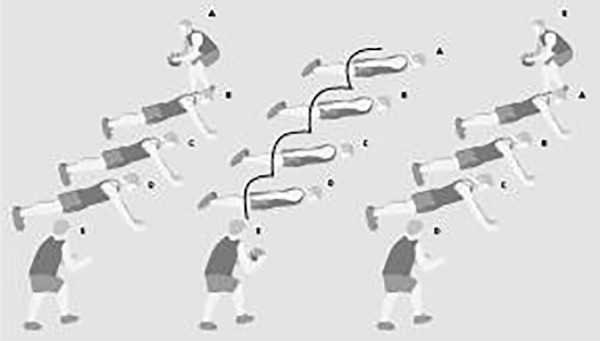
All participants except the front and back of the group lie down parallel in a row (facing the floor). There is a distance of one to two metres between the participants. The participant at the beginning of the chain has a ball at the start. On his or her command, the lying participants move into the push-up position and form a tunnel. The participant in front rolls the ball through the tunnel and then lies down in the row. On the other side of the tunnel, the ball is caught by the second standing participant (last in the row). The latter then hops over the participants who are lying down again and then rolls the ball through the tunnel. The last participant in the row becomes the new ball catcher. If the thrower does not roll the ball correctly through the tunnel or it does not reach the catcher, the attempt must be repeated (as often as necessary until it works).
Possible competition format: The winner is the group in which all participants have first rolled the ball through the tunnel once (or several times) and the whole group is back in a standing position.
Per group:
1 ball (e.g. basketball, softball, football, volleyball, medicine ball)
dodge ball
Stimulate circulation
Group work
2 groups
One group adjusts the ball/disc in a defined playing field so that they can touch a participant from the other group with the ball/disc ("dabbing", without throwing). You are not allowed to move with the ball/disc (maximum star step). Each "dab", or when a chased player leaves the playing field, results in a point. Which group collects more points in a given time?
Variant I:
If a participant touches the ball/disc, they are eliminated from the game (they may have to perform an additional task, such as remaining in a forearm support position). The sports leader times how long it takes for the entire group to be eliminated.
Variant II:
2-3 catchers try to touch the other participants with the ball/throwing disc (no throwing). Anyone touched by a catcher is eliminated and performs an additional task (e.g. 20 push-ups or trunk bends) and then takes part in the game again. The catchers are changed regularly
1 ball/throwing disc ►Basketball, Frisbee Ultimate, FooBaSKILL, Futsal/Football, Handball, Tchoukball
One group:
x game ribbons/bibs ►team identification
Sports leader:
1 stopwatch
Twister I
Parkour
Individual work
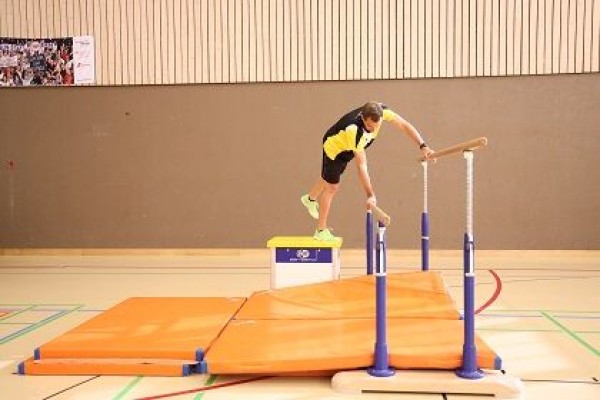
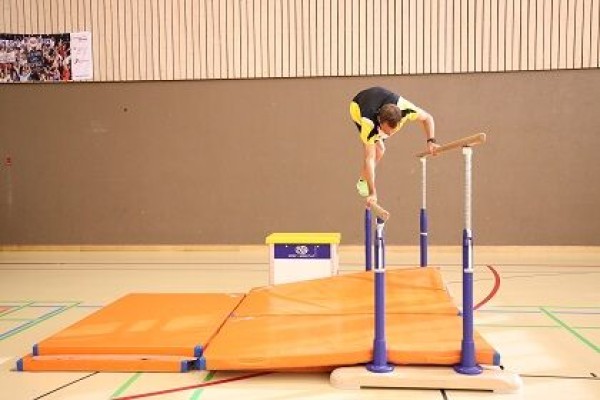
Climb onto the low bars of the uneven bars via the vaulting box, hold onto both bars with your hands, drop your legs between the two bars into the support, swing your legs forwards and jump off the uneven bars over the low bars, landing with both legs on a soft mat next to the uneven bars.
1 bar
1 vaulting box
4-5 soft mats (small)
Post setup:
Fix the uprights of a bar at different heights (height difference approx. 30-50cm), place a vaulting box in front of the bar (3-4 elements), lay out soft mats underneath
.
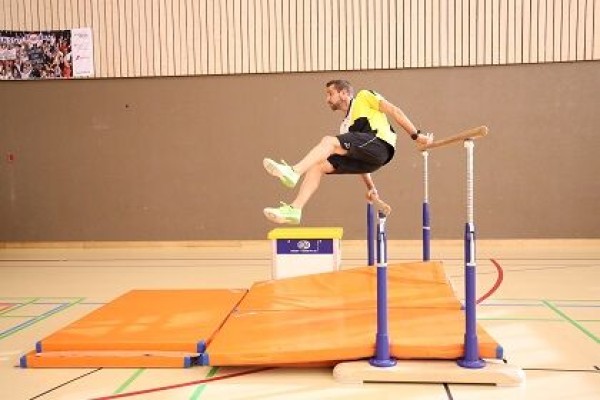
Twister II
Parkour
Individual work


Stand on the vaulting box, hold on to both bars with your hands, jump with both legs into the support between the two bars, swing your legs forwards and jump off the uneven bars over the low bars, landing with both legs on a soft mat next to the uneven bars.
1 bar
1 vaulting box
4-5 soft mats (small)
Post setup:
Fix the uprights of a bar at different heights (height difference approx. 30-50cm), place a vaulting box in front of the bar (3-4 elements), lay out soft mats underneath
.
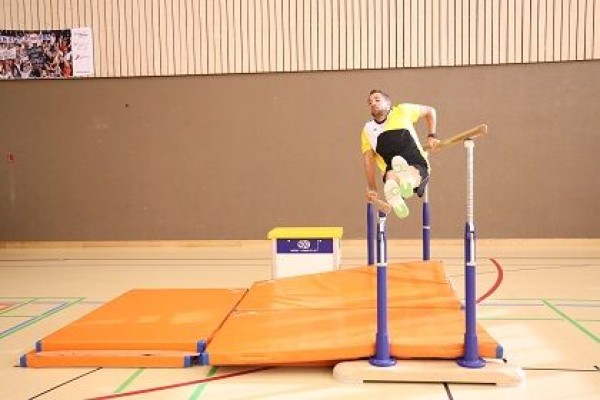
Twister III
Parkour
Individual work
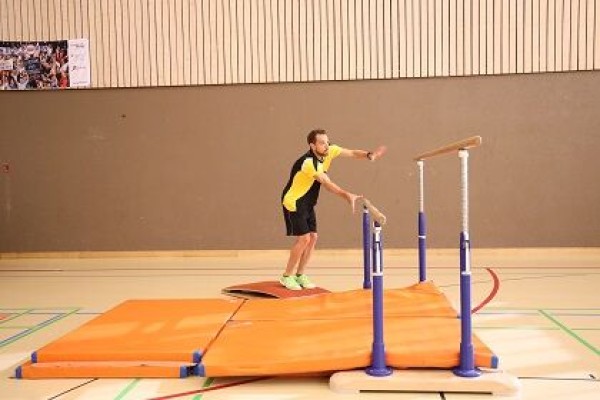
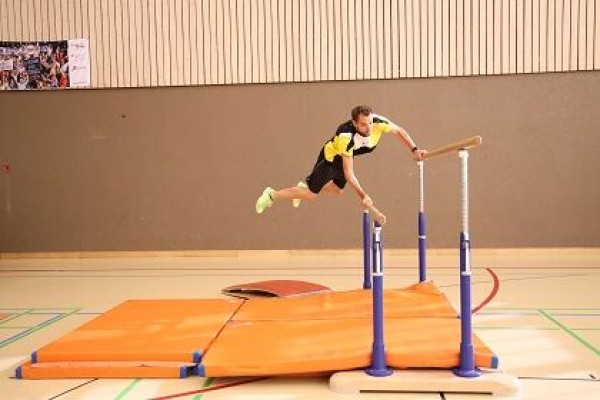
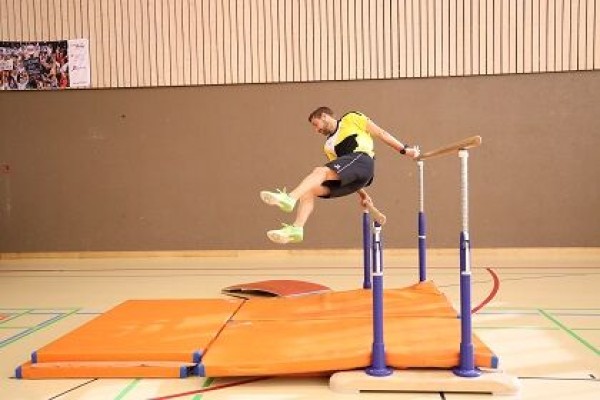
Short run-up, two-legged jump from the Reuter board into the support between the two bars of the uneven bars, swing the legs forwards and jump off the uneven bars over the low bars, landing with both legs on a soft mat next to the uneven bars.
1 bar
1 Reuter board
4-5 soft mats (small)
Post setup:
Fix the uprights of a bar at different heights (height difference approx. 30-50cm), place a Reuter board in front of the bar, lay out soft mats underneath