Exercises (3162)
Skilanglauf-Ergometer (m: 2000m/2km - 160kal; w: 1600m/1.6km/1 Mile - 120kal)
Power
Individual work

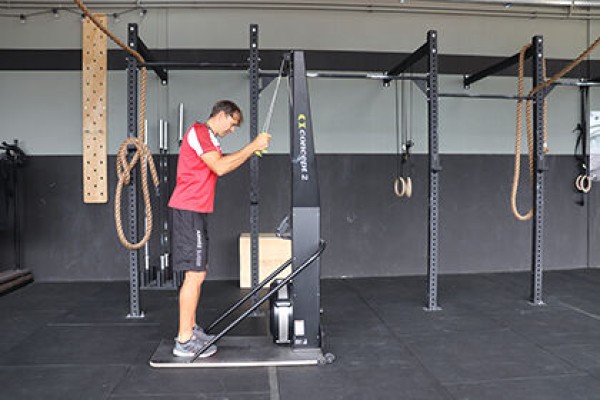


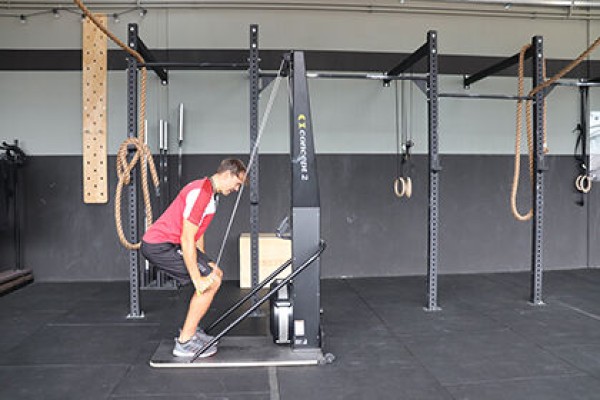


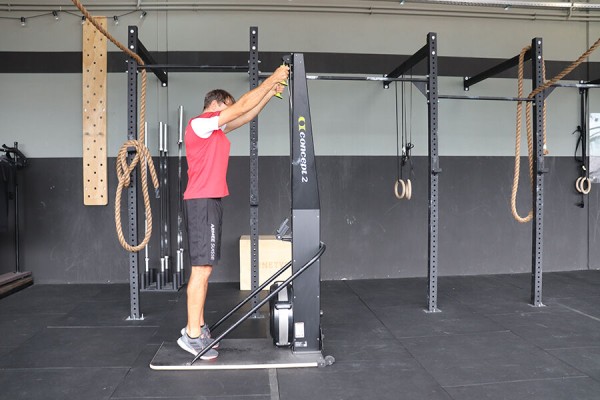
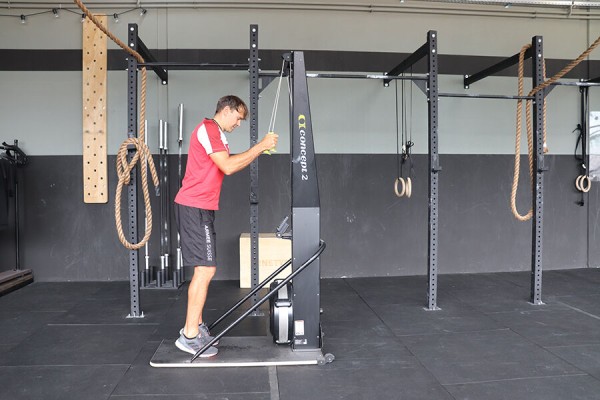
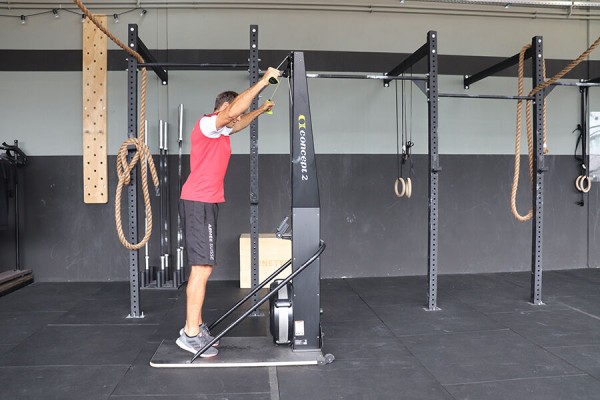
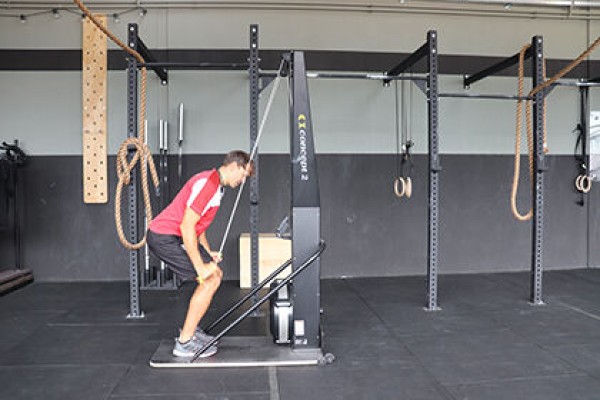
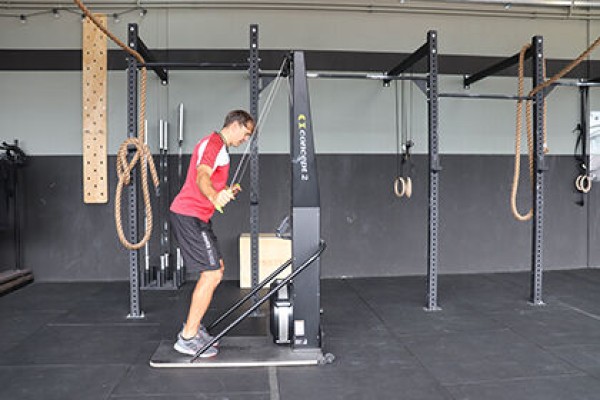
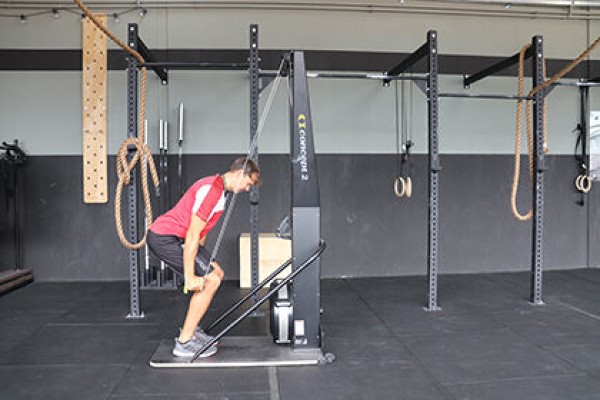
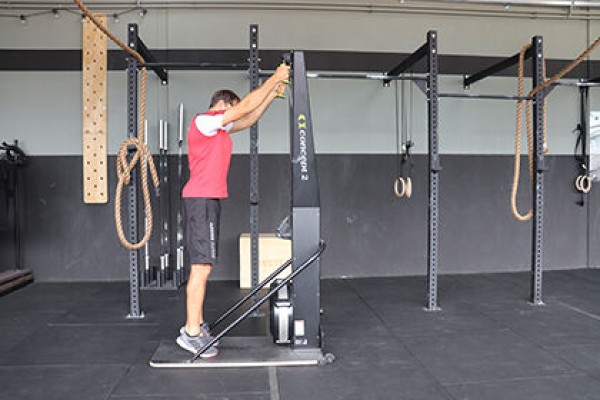
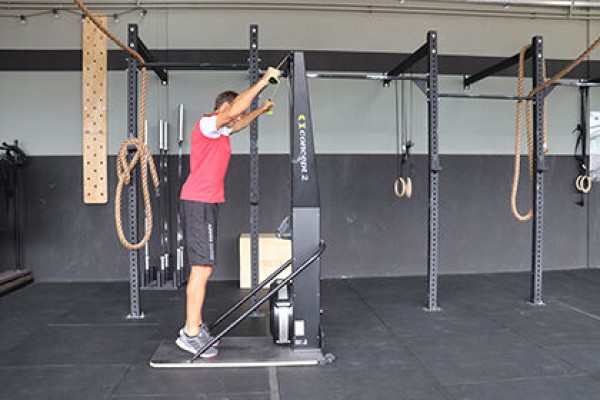
Working with the cross-country ski ergometer does not require any prior knowledge of winter sports, the technique is beginner-friendly and quick to learn. However, there are a few points to bear in mind: Firstly, stand with your feet slightly more than shoulder-width apart (how close you stand to the device is a matter of taste, although taller people usually prefer a greater distance in order to achieve a full arm extension at the starting point and therefore ultimately a longer stroke). The hands should also be just outside the shoulders when gripping the handles. As the handles of the device are attached to freely movable hinges, you can easily rotate them to your optimum position. The edges of the hand, including the little finger, should be placed on the thickened end of the handle, allowing more pressure to be applied. At the beginning of the pull, the entire body is stretched, only the arms remain slightly bent, the handles are now pulled downwards at an angle until the hands are just below the knees (a V-shaped curve, where the hands move sideways away from the body, is avoided). At the lowest point, the elbows are fully extended while the knees are minimally bent (comparable to the starting position of a jump). In the return phase, the body straightens up again completely, synchronised with the backswing of the arms. Lifting your heels off the ground is perfectly fine, especially at higher speeds.
Attention:
Do not turn every repetition into a squat, as this will tire your legs too quickly. Take a deep breath before each pull on the machine and keep the abdominal muscles under constant tension.
Lighten/Harden:
The intensity is controlled by adjusting the air valve. The higher the lever is moved on the scale (1-10), the wider the flap opens and the more air can flow into the bike. More air means more resistance in the initial phase of the pull (comparable to a higher pedalling resistance in the higher gears on a bicycle). It is important to find a setting at which a continuous and controlled pressure can be maintained. If the setting is too high, the air resistance initially has to be overcome with an excessively strong pull and the remaining range of motion "runs into nothing", which is a waste of energy. If you pay attention to the background noise, you will get a suitable indicator: the aim should be to achieve the smoothest possible whirring with only slight peaks in the initial phase of the pull. Most exercisers tend to over-optimise the resistance setting. As is so often the case, less is more; levels 6-7 work well for men and 4-6 for women, with exceptions for particularly heavy and strong athletes.
Variant:
The double pole technique is usually used for training, which means that both arms work in synchronisation with each other. The diagonal technique, in which the arms are used alternately, is less common but can be used as a variation. It achieves lower speeds than the simultaneous use of the arms, but is certainly suitable as an occasional training stimulus, which above all creates a healthy rotation of the spine and a strain on the lateral trunk muscles. The diagonal technique can also correct imbalances in unevenly developed back and arm muscles (e.g. after injuries).
1 cross-country ski ergometer
Cross-country ergometer (m: 200m - 16cal; w: 150m - 12cal)
Power
Individual work


Working with the cross-country ski ergometer does not require any prior knowledge of winter sports, the technique is beginner-friendly and quick to learn. However, there are a few points to bear in mind: Firstly, stand with your feet slightly more than shoulder-width apart (how close you stand to the device is a matter of taste, although taller people usually prefer a greater distance in order to achieve a full arm extension at the starting point and therefore ultimately a longer stroke). The hands should also be just outside the shoulders when gripping the handles. As the handles of the device are attached to freely movable hinges, you can easily rotate them to your optimum position. The edges of the hand, including the little finger, should be placed on the thickened end of the handle, allowing more pressure to be applied. At the beginning of the pull, the entire body is stretched, only the arms remain slightly bent, the handles are now pulled downwards at an angle until the hands are just below the knees (a V-shaped curve, where the hands move sideways away from the body, is avoided). At the lowest point, the elbows are fully extended while the knees are minimally bent (comparable to the starting position of a jump). In the return phase, the body straightens up again completely, synchronised with the backswing of the arms. Lifting your heels off the ground is perfectly fine, especially at higher speeds.
Attention:
Do not turn every repetition into a squat, as this will tire your legs too quickly. Take a deep breath before each pull on the machine and keep the abdominal muscles under constant tension.
Lighten/Harden:
The intensity is controlled by adjusting the air valve. The higher the lever is moved on the scale (1-10), the wider the flap opens and the more air can flow into the bike. More air means more resistance in the initial phase of the pull (comparable to a higher pedalling resistance in the higher gears on a bicycle). It is important to find a setting at which a continuous and controlled pressure can be maintained. If the setting is too high, the air resistance initially has to be overcome with an excessively strong pull and the remaining range of motion "runs into nothing", which is a waste of energy. If you pay attention to the background noise, you will get a suitable indicator: the aim should be to achieve the smoothest possible whirring with only slight peaks in the initial phase of the pull. Most exercisers tend to over-optimise the resistance setting. As is so often the case, less is more; levels 6-7 work well for men and 4-6 for women, with exceptions for particularly heavy and strong athletes.
Variant:
The double pole technique is usually used for training, which means that both arms work in synchronisation with each other. The diagonal technique, in which the arms are used alternately, is less common but can be used as a variation. It achieves lower speeds than the simultaneous use of the arms, but is certainly suitable as an occasional training stimulus, which above all creates a healthy rotation of the spine and a strain on the lateral trunk muscles. The diagonal technique can also correct imbalances in unevenly developed back and arm muscles (e.g. after injuries).
1 cross-country ski ergometer
Cross-country ergometer (m: 250m - 20cal; w: 200m - 15cal)
Power
Individual work


Working with the cross-country ski ergometer does not require any prior knowledge of winter sports, the technique is beginner-friendly and quick to learn. However, there are a few points to bear in mind: Firstly, stand with your feet slightly more than shoulder-width apart (how close you stand to the device is a matter of taste, although taller people usually prefer a greater distance in order to achieve a full arm extension at the starting point and therefore ultimately a longer stroke). The hands should also be just outside the shoulders when gripping the handles. As the handles of the device are attached to freely movable hinges, you can easily rotate them to your optimum position. The edges of the hand, including the little finger, should be placed on the thickened end of the handle, allowing more pressure to be applied. At the beginning of the pull, the entire body is stretched, only the arms remain slightly bent, the handles are now pulled downwards at an angle until the hands are just below the knees (a V-shaped curve, where the hands move sideways away from the body, is avoided). At the lowest point, the elbows are fully extended while the knees are minimally bent (comparable to the starting position of a jump). In the return phase, the body straightens up again completely, synchronised with the backswing of the arms. Lifting your heels off the ground is perfectly fine, especially at higher speeds.
Attention:
Do not turn every repetition into a squat, as this will tire your legs too quickly. Take a deep breath before each pull on the machine and keep the abdominal muscles under constant tension.
Lighten/Harden:
The intensity is controlled by adjusting the air valve. The higher the lever is moved on the scale (1-10), the wider the flap opens and the more air can flow into the bike. More air means more resistance in the initial phase of the pull (comparable to a higher pedalling resistance in the higher gears on a bicycle). It is important to find a setting at which a continuous and controlled pressure can be maintained. If the setting is too high, the air resistance initially has to be overcome with an excessively strong pull and the remaining range of motion "runs into nothing", which is a waste of energy. If you pay attention to the background noise, you will get a suitable indicator: the aim should be to achieve the smoothest possible whirring with only slight peaks in the initial phase of the pull. Most exercisers tend to over-optimise the resistance setting. As is so often the case, less is more; levels 6-7 work well for men and 4-6 for women, with exceptions for particularly heavy and strong athletes.
Variant:
The double pole technique is usually used for training, which means that both arms work in synchronisation with each other. The diagonal technique, in which the arms are used alternately, is less common but can be used as a variation. It achieves lower speeds than the simultaneous use of the arms, but is certainly suitable as an occasional training stimulus, which above all creates a healthy rotation of the spine and a strain on the lateral trunk muscles. The diagonal technique can also correct imbalances in unevenly developed back and arm muscles (e.g. after injuries).
1 cross-country ski ergometer
Cross-country ski ergometer (m: 375m - 30kal; w: 300m - 22kal)
Power
Individual work


Working with the cross-country ski ergometer does not require any prior knowledge of winter sports, the technique is beginner-friendly and quick to learn. However, there are a few points to bear in mind: Firstly, stand with your feet slightly more than shoulder-width apart (how close you stand to the device is a matter of taste, although taller people usually prefer a greater distance in order to achieve a full arm extension at the starting point and therefore ultimately a longer stroke). The hands should also be just outside the shoulders when gripping the handles. As the handles of the device are attached to freely movable hinges, you can easily rotate them to your optimum position. The edges of the hand, including the little finger, should be placed on the thickened end of the handle, allowing more pressure to be applied. At the beginning of the pull, the entire body is stretched, only the arms remain slightly bent, the handles are now pulled downwards at an angle until the hands are just below the knees (a V-shaped curve, where the hands move sideways away from the body, is avoided). At the lowest point, the elbows are fully extended while the knees are minimally bent (comparable to the starting position of a jump). In the return phase, the body straightens up again completely, synchronised with the backswing of the arms. Lifting your heels off the ground is perfectly fine, especially at higher speeds.
Attention:
Do not turn every repetition into a squat, as this will tire your legs too quickly. Take a deep breath before each pull on the machine and keep the abdominal muscles under constant tension.
Lighten/Harden:
The intensity is controlled by adjusting the air valve. The higher the lever is moved on the scale (1-10), the wider the flap opens and the more air can flow into the bike. More air means more resistance in the initial phase of the pull (comparable to a higher pedalling resistance in the higher gears on a bicycle). It is important to find a setting at which a continuous and controlled pressure can be maintained. If the setting is too high, the air resistance initially has to be overcome with an excessively strong pull and the remaining range of motion "runs into nothing", which is a waste of energy. If you pay attention to the background noise, you will get a suitable indicator: the aim should be to achieve the smoothest possible whirring with only slight peaks in the initial phase of the pull. Most exercisers tend to over-optimise the resistance setting. As is so often the case, less is more; levels 6-7 work well for men and 4-6 for women, with exceptions for particularly heavy and strong athletes.
Variant:
The double pole technique is usually used for training, which means that both arms work in synchronisation with each other. The diagonal technique, in which the arms are used alternately, is less common but can be used as a variation. It achieves lower speeds than the simultaneous use of the arms, but is certainly suitable as an occasional training stimulus, which above all creates a healthy rotation of the spine and a strain on the lateral trunk muscles. The diagonal technique can also correct imbalances in unevenly developed back and arm muscles (e.g. after injuries).
1 cross-country ski ergometer
Cross-country ski ergometer (m: 500m - 40k; w: 400m - 30k)
Power
Individual work


Working with the cross-country ski ergometer does not require any prior knowledge of winter sports, the technique is beginner-friendly and quick to learn. However, there are a few points to bear in mind: Firstly, stand with your feet slightly more than shoulder-width apart (how close you stand to the device is a matter of taste, although taller people usually prefer a greater distance in order to achieve a full arm extension at the starting point and therefore ultimately a longer stroke). The hands should also be just outside the shoulders when gripping the handles. As the handles of the device are attached to freely movable hinges, you can easily rotate them to your optimum position. The edges of the hand, including the little finger, should be placed on the thickened end of the handle, allowing more pressure to be applied. At the beginning of the pull, the entire body is stretched, only the arms remain slightly bent, the handles are now pulled downwards at an angle until the hands are just below the knees (a V-shaped curve, where the hands move sideways away from the body, is avoided). At the lowest point, the elbows are fully extended while the knees are minimally bent (comparable to the starting position of a jump). In the return phase, the body straightens up again completely, synchronised with the backswing of the arms. Lifting your heels off the ground is perfectly fine, especially at higher speeds.
Attention:
Do not turn every repetition into a squat, as this will tire your legs too quickly. Take a deep breath before each pull on the machine and keep the abdominal muscles under constant tension.
Lighten/Harden:
The intensity is controlled by adjusting the air valve. The higher the lever is moved on the scale (1-10), the wider the flap opens and the more air can flow into the bike. More air means more resistance in the initial phase of the pull (comparable to a higher pedalling resistance in the higher gears on a bicycle). It is important to find a setting at which a continuous and controlled pressure can be maintained. If the setting is too high, the air resistance initially has to be overcome with an excessively strong pull and the remaining range of motion "runs into nothing", which is a waste of energy. If you pay attention to the background noise, you will get a suitable indicator: the aim should be to achieve the smoothest possible whirring with only slight peaks in the initial phase of the pull. Most exercisers tend to over-optimise the resistance setting. As is so often the case, less is more; levels 6-7 work well for men and 4-6 for women, with exceptions for particularly heavy and strong athletes.
Variant:
The double pole technique is usually used for training, which means that both arms work in synchronisation with each other. The diagonal technique, in which the arms are used alternately, is less common but can be used as a variation. It achieves lower speeds than the simultaneous use of the arms, but is certainly suitable as an occasional training stimulus, which above all creates a healthy rotation of the spine and a strain on the lateral trunk muscles. The diagonal technique can also correct imbalances in unevenly developed back and arm muscles (e.g. after injuries).
1 cross-country ski ergometer
Cross-country ski ergometer (m: 750m - 60k; w: 600m - 45k)
Power
Individual work


Working with the cross-country ski ergometer does not require any prior knowledge of winter sports, the technique is beginner-friendly and quick to learn. However, there are a few points to bear in mind: Firstly, stand with your feet slightly more than shoulder-width apart (how close you stand to the device is a matter of taste, although taller people usually prefer a greater distance in order to achieve a full arm extension at the starting point and therefore ultimately a longer stroke). The hands should also be just outside the shoulders when gripping the handles. As the handles of the device are attached to freely movable hinges, you can easily rotate them to your optimum position. The edges of the hand, including the little finger, should be placed on the thickened end of the handle, allowing more pressure to be applied. At the beginning of the pull, the entire body is stretched, only the arms remain slightly bent, the handles are now pulled downwards at an angle until the hands are just below the knees (a V-shaped curve, where the hands move sideways away from the body, is avoided). At the lowest point, the elbows are fully extended while the knees are minimally bent (comparable to the starting position of a jump). In the return phase, the body straightens up again completely, synchronised with the backswing of the arms. Lifting your heels off the ground is perfectly fine, especially at higher speeds.
Attention:
Do not turn every repetition into a squat, as this will tire your legs too quickly. Take a deep breath before each pull on the machine and keep the abdominal muscles under constant tension.
Lighten/Harden:
The intensity is controlled by adjusting the air valve. The higher the lever is moved on the scale (1-10), the wider the flap opens and the more air can flow into the bike. More air means more resistance in the initial phase of the pull (comparable to a higher pedalling resistance in the higher gears on a bicycle). It is important to find a setting at which a continuous and controlled pressure can be maintained. If the setting is too high, the air resistance initially has to be overcome with an excessively strong pull and the remaining range of motion "runs into nothing", which is a waste of energy. If you pay attention to the background noise, you will get a suitable indicator: the aim should be to achieve the smoothest possible whirring with only slight peaks in the initial phase of the pull. Most exercisers tend to over-optimise the resistance setting. As is so often the case, less is more; levels 6-7 work well for men and 4-6 for women, with exceptions for particularly heavy and strong athletes.
Variant:
The double pole technique is usually used for training, which means that both arms work in synchronisation with each other. The diagonal technique, in which the arms are used alternately, is less common but can be used as a variation. It achieves lower speeds than the simultaneous use of the arms, but is certainly suitable as an occasional training stimulus, which above all creates a healthy rotation of the spine and a strain on the lateral trunk muscles. The diagonal technique can also correct imbalances in unevenly developed back and arm muscles (e.g. after injuries).
1 cross-country ski ergometer
Ski jumper
Coordination exercises
Individual work
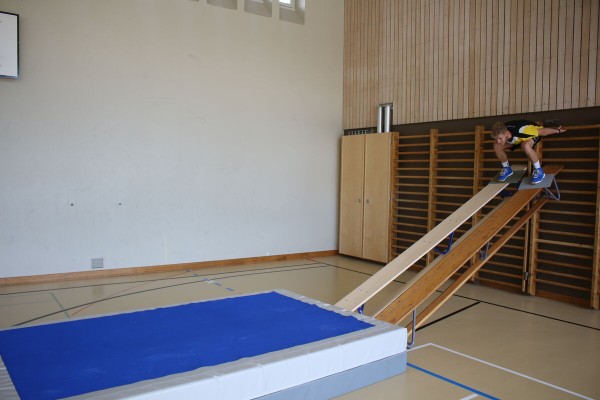
Stand on carpet remnants in a squat position at the top of the long benches (one foot per long bench). Hold on to the wall bars backwards and slide down in a squat position. At the end of the long bench, jump off in a ski jumping position (stretched body) and land on the soft mat.
Variant:
Change the steepness of the run-up.
►Balance, orientation and reaction skills
1 wall bars
2 long benches
2 Tepich rests
1 soft mat (large)
Post setup:
Hook two long benches to one side of the wall bars (at a height of approx. 1.5m). Place a large soft mat in front of the long benches.
Slalom
Coordination exercises
Individual work
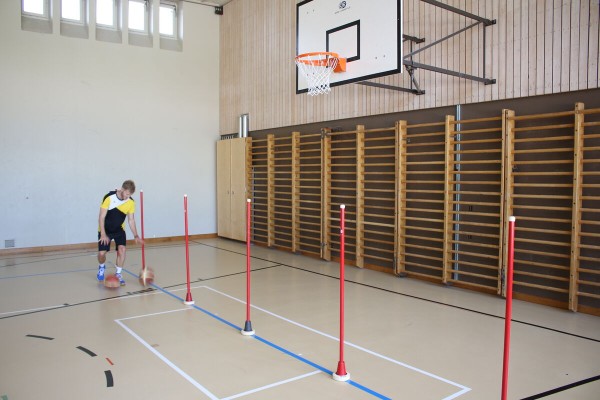
Run a slalom between the stakes while bouncing two balls at the same time.
Variation: Bounce both balls at the same time or alternately.
► Rhythmisation skills, differentiation skills
6 stakes
2 basketballs
Post set-up:
Place the stakes on a line about one metre apart
Slalom
Coordination exercises
Individual work

The participants run a slalom between marker cones/caps while bouncing two different balls simultaneously.
Variant:
Bounce both balls simultaneously or alternately (change rhythm).
► Rhythmisation ability, differentiation ability
8-10 marker cones/caps
2 various balls (e.g. basketball, football, volleyball, tennis ball, handball, foam ball)
Post set-up:
Set up a slalom with marker cones (cones/caps offset sideways).
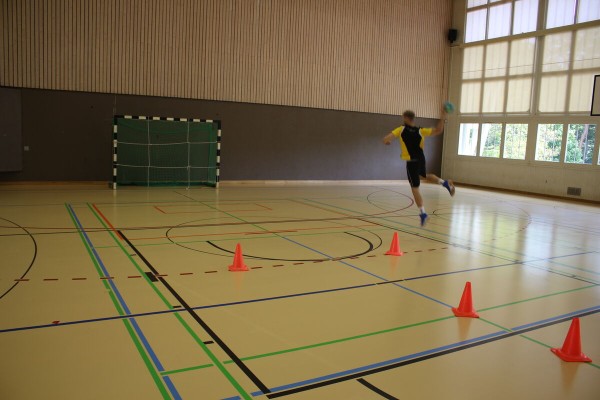
Slalom with finish
Coordination exercises
Individual work
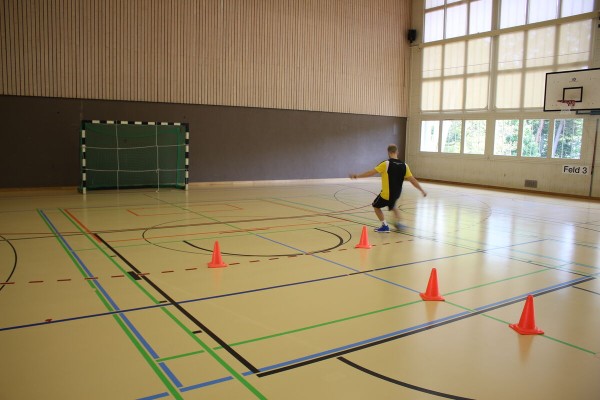
The participant guides a futsal/football in a slalom around the marking cones, sometimes starting on the right, sometimes on the left. At the height of the last cone, the participants shoot at the goal and try to hit the various zones in the goal, which are divided by ropes. Make sure to dribble and shoot with both the stronger and weaker foot.
► Differentiation skills, orientation skills
1 (handball) goal
6 ropes
4-8 marking cones/caps/painting sticks
1 futsal/football
Post set-up:
Set up a slalom towards the (handball) goal using marking cones. The last marker is approx. 7 metres in front of the goal. Divide the goal into several zones with ropes.
Slalom with finish
Coordination exercises
Individual work
The participant bounces a handball in a slalom around the marking cones, sometimes starting on the right, sometimes on the left. At the height of the last cone, the participant throws at the goal and tries to hit the various zones in the goal, which are divided by ropes. Make sure to dribble and throw with both the stronger and weaker hand.
► Differentiation ability, rhythmisation ability, orientation ability
1 handball goal
6 ropes
4-8 marking cones/caps/painting sticks
1 handball
Post set-up:
Set up a slalom towards the (handball) goal using marking cones. The last marker is approx. 7 metres in front of the goal. Divide the goal into several zones with ropes.
Slalom with finish
Coordination exercises
Individual work
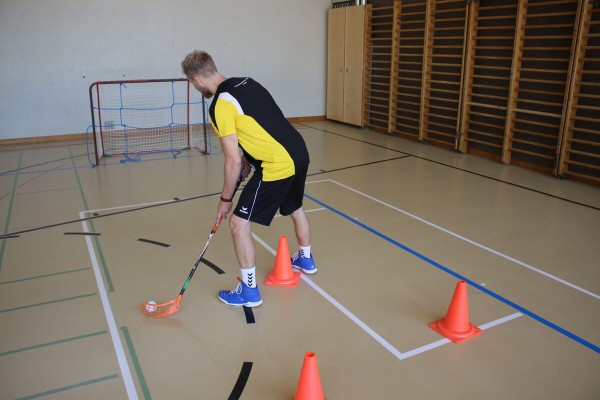
The participant dribbles a floorball with a stick in a slalom around the marking cones, sometimes starting on the right, sometimes on the left. At the height of the last cone, the participant shoots at the goal and tries to hit the various zones in the goal, which are divided by ropes.
► Differentiation ability, orientation ability
1 floorball goal
6 ropes
4-8 marking cones/caps/painting sticks
1 floorball stick
1 floorball ball
Post set-up:
Set up a slalom towards the floorball goal using marking cones. The last marker is approx. 7 metres in front of the goal. Divide the goal into several zones with ropes.
Slalom with basketball
Coordination exercises
Individual work
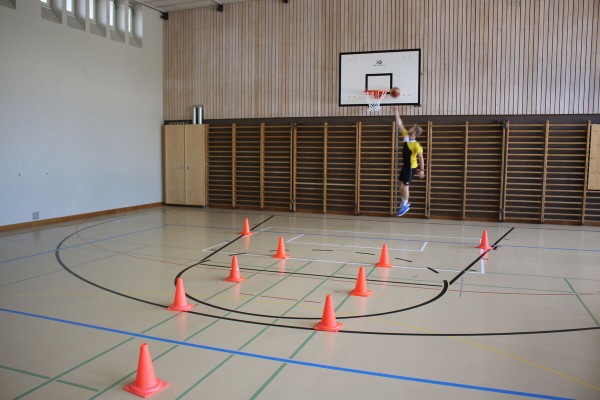
Bounce a basketball in a slalom around the marking cones, starting on the right and then on the left - on the right side you bounce with your right hand, on the left side with your left hand. When you reach the last cone, you finish with a basket shot (be careful: correct "jam-ta-tam" rhythm). Coming from the right side, you throw with your right hand - coming from the left side, you throw with your left hand.
►Differentiation ability, rhythmisation ability
1 basketball hoop
4-8 marker cones
2 basketballs
Post set-up:
Set up a slalom with the marker cones (cones offset sideways). The last cone is between the basket and the free-throw line
.
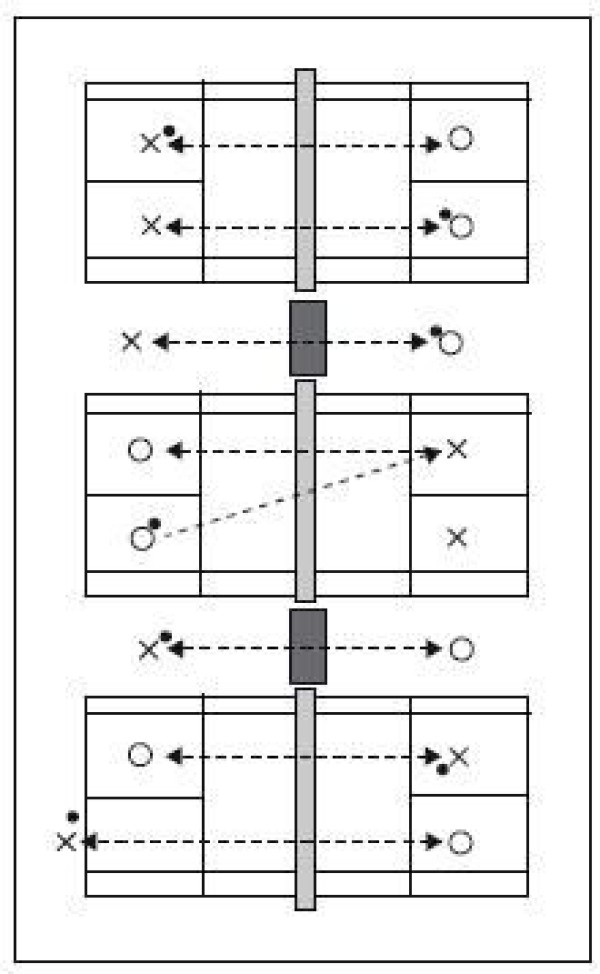
Slalom relay
Increase pulse
Group work
4-5 participants per group
One runner runs in a slalom to the turning point (e.g. colouring stick, marker cone or cone) or to the hall wall and back. On the way back, the runner either also performs a slalom or runs directly to the group to send the next runner onto the course.
Variant:
At the first and last obstacle or at each obstacle (e.g. painting stick, marker cone or cone), perform a complete turn around the slalom marker.
Replacements: Run over a line (with a handshake), through a gate, around the group with a handshake (on the back), crawl through the legs of the next runner, hand over an object, etc.
Per group:
5-7 colouring sticks
Slalom relay
Increase pulse
Group work
4-5 participants per group
One runner runs in a slalom to the turning point (e.g. colouring stick, marker cone or cone) or to the hall wall and back. The runner then either runs back in a slalom or runs directly to the group to send the next runner onto the course. There are different exercise variations with the ball:
Single run:
- Carry ball
- Ball (e.g. medicine ball or gym ball). medicine ball or gym ball) in a high hold
- Carry the ball on your thighs in a four-footed gait
- Tuck the ball between your feet and bounce
- Bounce the ball
- Dribble the ball with your feet
- Roll the ball with your hands
In a binomial:
- Pinch the ball between the partners (hands must not hold the ball after the start)
Variant:
At the first and last obstacle or at each obstacle (e.g. colouring stick, marker cone).At the first and last obstacle or at each obstacle (e.g. colouring stick, marker cone or cone), make a complete turn around the slalom markings.
Releases: Run around the waiting group back to the next runner to hand over the ball - roll the ball forwards between the legs - pass the ball forwards over the heads - stop the ball on one or between two lines, then hand over the ball to the next runner with a handshake
.Per group:
5-7 colouring sticks
1 ball (football, volleyball, basketball or handball)
1 medicine or exercise ball
Slalom relay
Increase pulse
Group work
4-5 participants per group
A runner runs in a slalom to the turning goal (e.g. colouring stick, marking cone or cone) or to the hall wall and back. The runner uses the floorball or intercross pole to guide a ball, while the Nordic walking poles are only used to run around the inserted poles (=slalom). The runner either runs the return route in a slalom or runs directly to the group to send the next runner onto the course.
Variant:
At the first and last obstacle or at each obstacle (e.g. marker stick, marker cone or cone), make a complete turn around the slalom marker.
Replacements:
- Unihockey/intercrosse stick: From a defined line, a pass is played to the next participant in the group, run behind the group and pass the ball between the legs to the front or pass the ball behind the starting line.
- Nordic walking sticks: Run across a line (with a handshake), through a gate, around the group with a handshake, crawl through the legs of the next runner, pass an object, etc.
Per group:
5-7 painting sticks
1 Intercrosse / floorball ball
1 Intercrosse / floorball stick
2 Nordic walking sticks
Slalom relay
Increase pulse
4-5 participants per group
One runner runs in a slalom to the turning point (e.g. colouring stick, marker cone or cone) or to the hall wall and back. On the way back, the runner either also runs in a slalom or runs directly to the group to send the next runner onto the course. The course can be completed as follows:
- Balance the ball on the bat
- Juggle the ball with the bat
- Bounce the ball on the ground
- Roll/guide the ball along the ground
Variant:
At the first, last or at each obstacle (e.g. painting stick, marker cone, etc.), the runner must
At the first, last or at each obstacle (e.g. marker stick, marker cone or cone), perform a complete turn around the slalom markings.
Replacements: From a defined line, a pass is played to the next participant in the group, who catches the ball with the racket without it falling to the ground (until successful or a maximum of three attempts) - run behind the group and pass the ball forwards between the legs - pass the ball behind the starting line with the racket (without hands).
Per group:
5-7 colouring sticks
1 Smolball
Per participant:
1 Smolball bat
Smolball
Games / Tournament
Game idea:
Two teams with several outfield players and a goalkeeper play the softball into the opponent's goal by attacking skilfully. Good defensive behaviour should prevent the opponent from scoring goals.
Scoring:
A goal is scored when the ball completely crosses the goal line.
Playing field:
Smolball field (22mx36m). Two goals with a goal area (2mx5m).
The entire hall is used as a playing field (hall walls are part of the playing field). In the field, side and base lines delimit the playing field.
Number of participants:
4 against 4 (3 field players plus goalkeeper)
Game rules:
The game begins with a bouncing ball in the centre of the field. One player from each team touches the centre with the tip of their stick. By throwing up the cue ball, the referee releases the game.
The following 4-man rules apply to smolball:
- The ball, which is balanced on the racket, may be carried a maximum of 4 steps and must then be passed immediately.
- The ball may be touched a maximum of 4 times before it is passed on.
- The ball may be touched a maximum of 4 times before it is played on (picking up the ball from the ground does not count as touching the ball).
- The ball at rest on the racket, without the player moving, may be held for a maximum of 4 seconds.
- The ball may not be covered with the racket or the body, but must be played on immediately. If the ball is on the ground, it may only be picked up from the ground with the racket without touching any part of the body and played on. It is not permitted to actively play the ball with the foot, lower leg, hand, arm or head.
Stick shots, body shots, attacks from behind, active body contact and playing the ball against the ceiling result in a free hit for the opposing team. The free hit is taken indirectly at the place of the offence, whereby the opponent must keep a distance of 4m. Exceptions to this rule are offences committed behind the goal and in the goal area. In these cases, the free shot is taken from the front corner of the goal area. If a goal-scoring opportunity is prevented by a violation of the rules, the fouled player is awarded a penalty (direct shot from a distance of 4m; the goalkeeper stands with both feet on the goal line; the field players stand 4m behind the penalty taker).
If Smolball is played on an outdoor pitch, the boundary of the pitch plays an additional role. If the ball leaves the field of play, it is brought back into play by a free hit by the opposing team at the place of the incident.
Smolball: Carousel
Forms of play / exercises
Group work
Simple standard pass and shot exercise: The players stand in both corners next to the goal. The foremost player runs in a high arc into the centre in front of the goal (around the marker stick). There he receives the ball from the other side and shoots (at the height of the two cones). The passer runs up next and shoots at the goal.
Variations:
- Shooting at the empty goal or whoever has shot then stands in the goal themselves.
- The sports leader can demand different types of shots (direct shots are also possible).
Per group:
1 floorball goal
x Smolballs
4 cones
1 colouring stick
Per participant:
1 Smolball stick
Smolball: slalom and goal kick
Forms of play / exercises
Group work

The participants run through a slalom course consisting of stakes juggling with the ball on the stick, before placing the ball on the ground and dribbling it with the stick through a slalom course marked with marker cones. Once the ball reaches a defined line, a shot on goal is taken from there.
Additional strengthening task:
If you don't hit the goal, complete a strength exercise: 10x trunk bend (sit up)
2 (small/medium) goals
2-4 smolball bats (depending on the number of participants)
2-4 smolball balls (depending on the number of participants)
8 stakes
8 marker cones
Smolball: Czech square
Forms of play / exercises
Group work

3 to 4 players form a triangle or a square in a confined space (markings). An additional player goes into the centre. The outside players now pass to the centre player one after the other. The centre player passes the ball directly to the next player. The centre player decides which player to pass to.
Variations:
- The outfield players immediately take the position of the player in the middle after passing the ball.
- An additional ball is brought into play.
- Outfield players can also pass to outfield players.
- Outfield players only pass to outfield players. The player in the centre must try to touch the ball. The outfield player who last touched the ball must swap positions in the centre.
Per participant:
1 smolball bat
Per group:
1 smolball ball
Smolball: Wimbledon
Forms of play / exercises
Player against player
The players face each other like in a tennis match. A line, a net or a long bench (wide side down) serves as a boundary in the centre of the court. The playing area is defined by markings or by mutual agreement (e.g. badminton markings). The game is played according to the rules of tennis, starting from the bottom behind the baseline. A game lasts 5 to 10 minutes, after which the players switch clockwise.
This game organisation enables movement-intensive lessons with a focus on promoting playing skills in heterogeneous classes.
Variants:
- The rules are determined by mutual agreement between the opponents. Each pairing can set different rules for their game.
- Different "nets" are set up (Swedish box, long bench, badminton net, rope, etc.).
- Doubles are played.
- Different balls are used (smolball, tennis ball, table tennis ball).
- After the pass, turn around your own body axis and reorient yourself.
- The game form can also be used as a form of practice for passing (forehand / backhand; long / short passes; receiving the ball, etc.)
Per team:
1 smolball racket
Pitch:
1 long bench / vaulting box / mini tennis net
1 smolball ball
Sparring
Light-Contact
Group work
Groups of 3
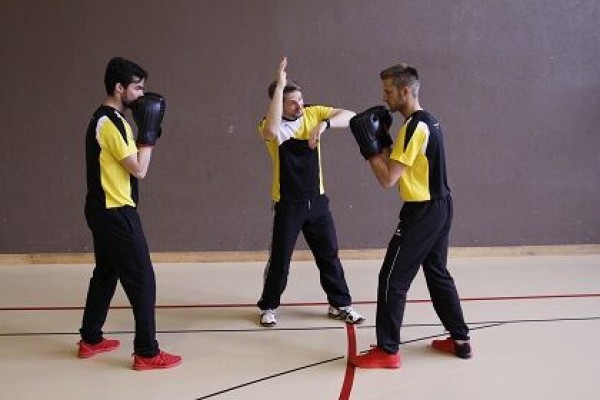
Sparring in a three-man team: two boxers and a referee. After a while, the roles are switched.
Participant:
1 pair of boxing gloves
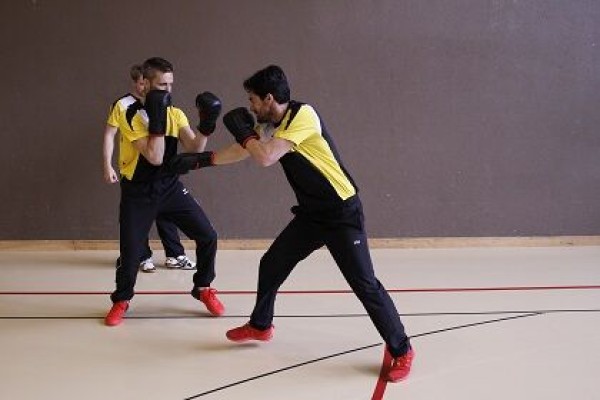
Sparring
Light-Contact
Partner work


Sparring between two participants, with one always taking the role of the attacker and the other the defender. In the next round, the roles are swapped. The attacker makes sure to constantly cut the defender's path (shorten the path) so that he can immediately move on to the next attack. The defender, for his part, tries to evade the attacker by moving in the shape of a banana.
Participant:
1 pair of boxing gloves
Sparring with restrictions
Light-Contact
Partner work
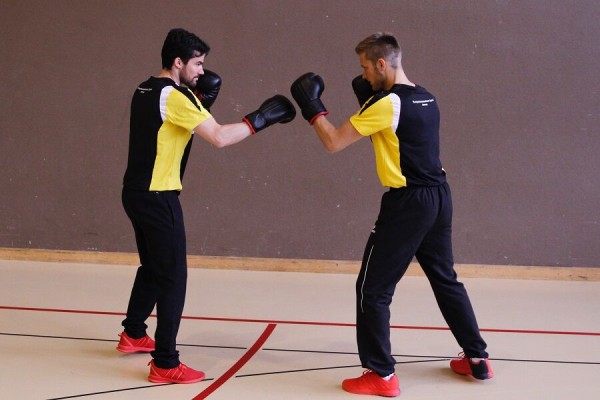
Sparring with restrictions, e.g. both boxers only use the lead hand.
Participant:
1 pair of boxing gloves