Exercises (3159)
Move arm crosswise upwards while standing
Power
Individual work
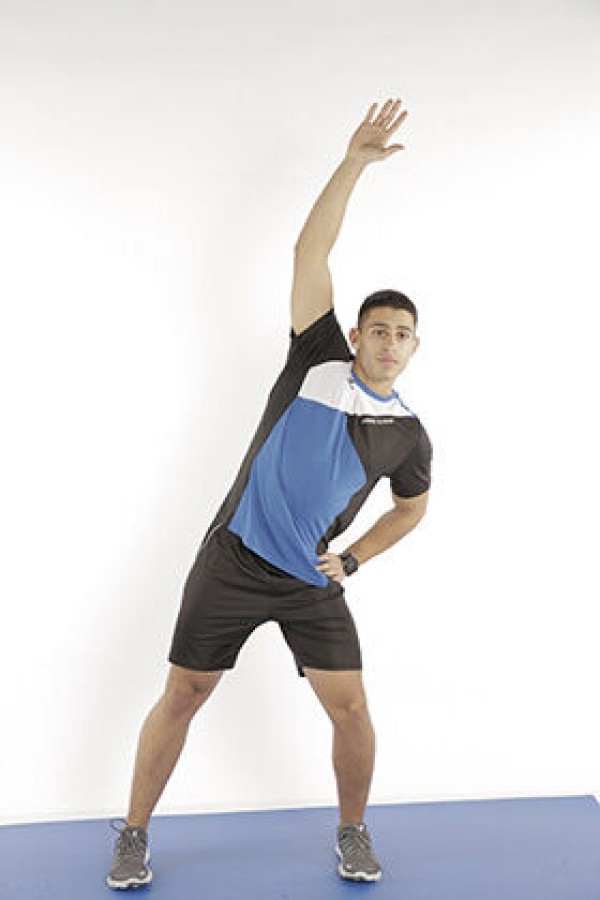

Stand upright, arms supported on the hips, alternately extend one arm over the head to the other side, with the upper body accompanying the movement.
Lighten:
Smaller movements (less rotation).
Harden:
Additional weight (hold on the arms or in both hands).
Variant:
Hold an additional weight (e.g. weight disc) with both hands above the head and rotate the upper body alternately to the side (arms remain raised).
2 weight cuffs/weight balls/dumbbells ► make the exercise more difficult
1 weight disc ► variation of the exercise
Bring your arm in front of your body while standing (left) ► fly
Power
Individual work
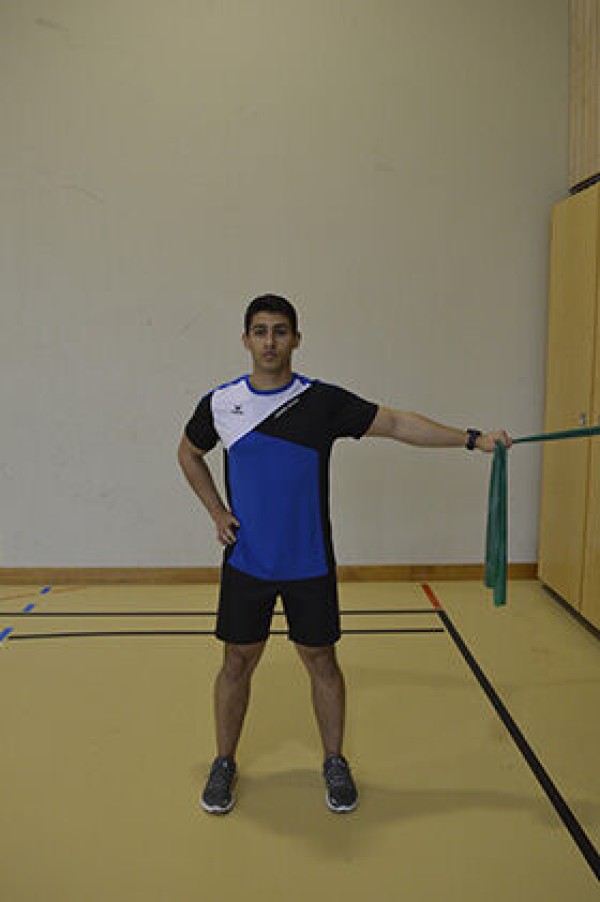
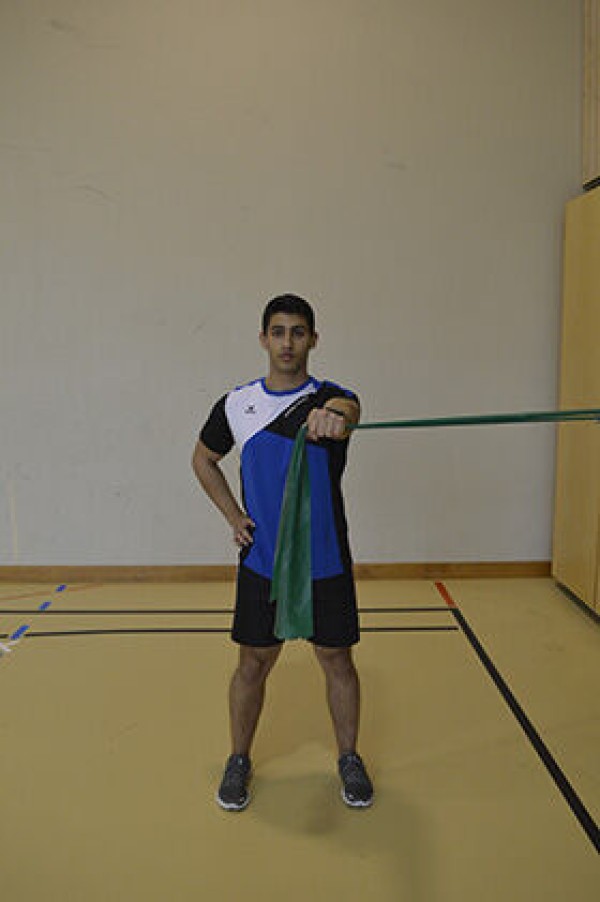
Stand upright, shoulder-width apart, sideways (90 degrees) to the wall bars (or e.g. to a tree), fix the elastic band at chest height on the wall bars (on the tree), extend your arm (left, side of the fixation) at chest height to the wall (to the tree), grasp the elastic band with an outstretched arm, bring your arm with a slightly bent elbow at chest height in front of your body (body centre) and back to the starting position.
Attention:
Movement takes place exclusively in the shoulder joint/upper body remains stable (no torso rotation).
Lighten:
Choose an elastic band with less resistance.
Harden:
Choose an elastic band with greater resistance.
1 elasticated rubber band
Bring your arm in front of your body while standing (right) ► fly
Power
Individual work
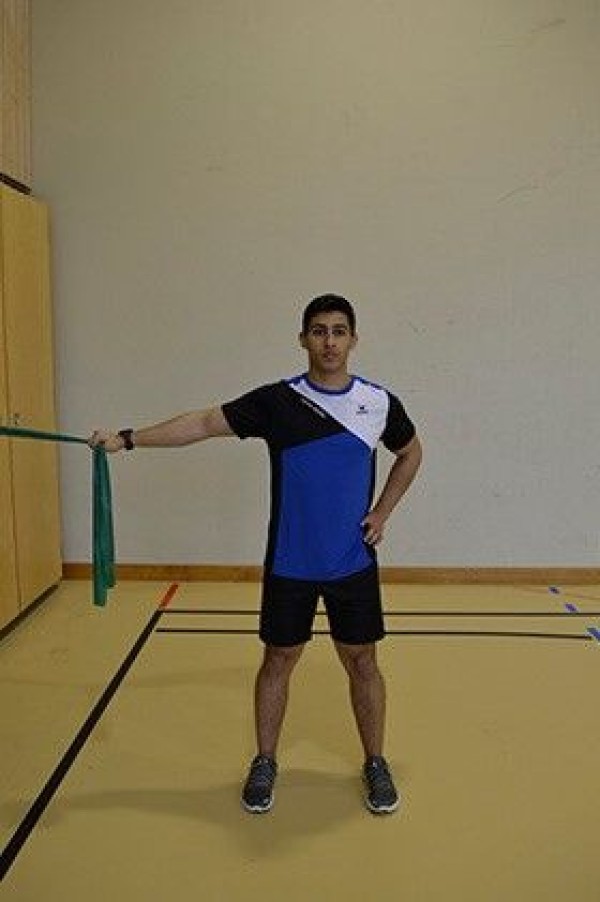
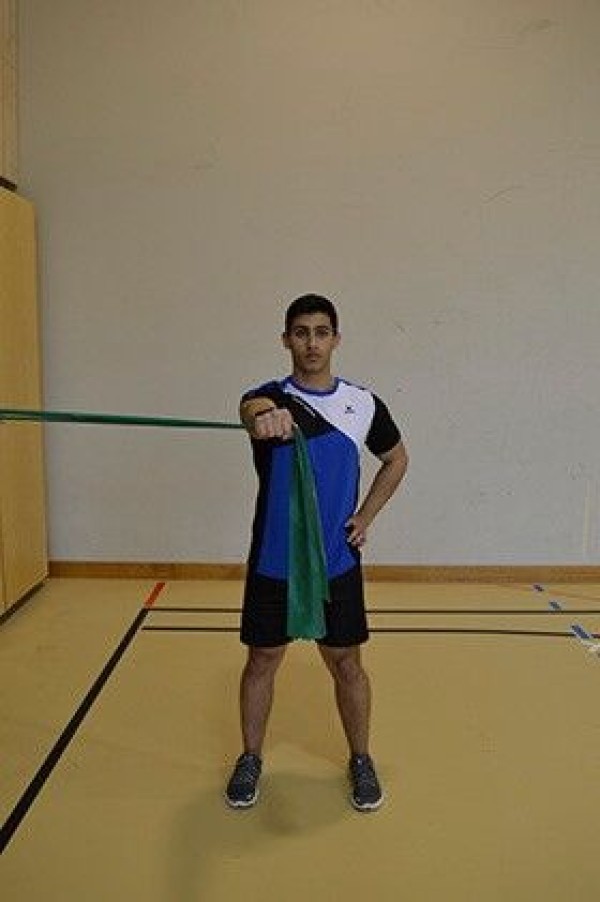
Stand upright, shoulder-width apart, sideways (90 degrees) to the wall bars (or e.g. to a tree), fix the elastic band at chest height on the wall bars (on the tree), extend your arm (right, side of the fixation) at chest height to the wall (to the tree), grasp the elastic band with an outstretched arm, bring your arm with a slightly bent elbow at chest height in front of your body (body centre) and back to the starting position.
Attention:
Movement takes place exclusively in the shoulder joint/upper body remains stable (no torso rotation).
Lighten:
Choose an elastic band with less resistance.
Harden:
Choose an elastic band with greater resistance.
1 elasticated rubber band
1 wall bar/tree
Arm wrestling
Fighting and roughhousing games
Partner work
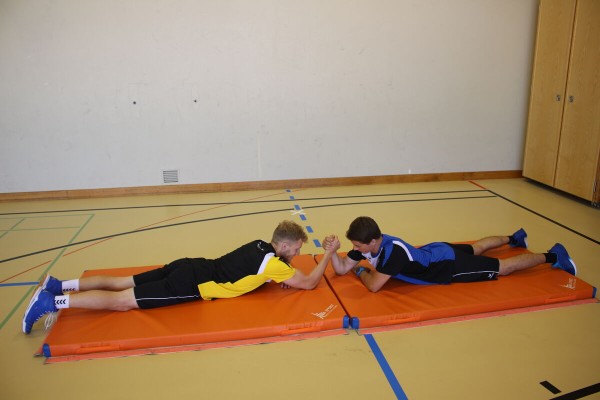
Two participants lie on their stomachs facing each other and hold hands with their elbows supported on the mat/floor. The free arm is supported on the forearm under the chest. The participants try to press the back of their opponent's hand onto the mat/floor. The first person to touch the mat/floor with the back of their hand loses. Change sides after each or several rounds.
2 soft mats (small) ►indoor version
2 tent sheets ►outdoor version
Indoor post set-up:
Connect the soft mats to each other on the narrow side using Velcro (exercise can also be carried out without mats)
Move arms to the side in opposite directions while seated ► rear delt raise / reverse fly
Power
Individual work
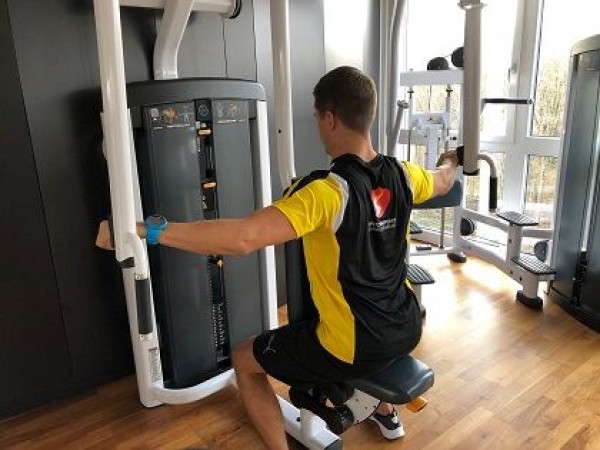
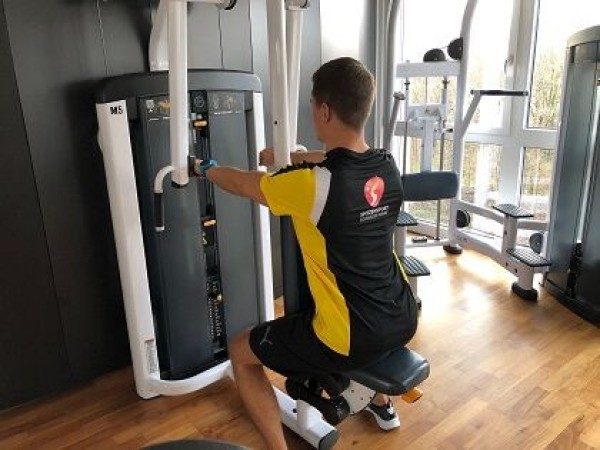
While seated, hold your arms in front of you at chest height and grasp the handles (overhand grip), spread your arms out to each side against the resistance of the weight (T-position) and return to the starting position. As you move your arms backwards, imagine that you want to pinch an object between your shoulder blades.
Starting position:
- Sitting with arms stretched forwards at chest height
- Straight back stretched out
Finishing position:
- Arms at shoulder height tucked to the side of the body
Attention:
Be aware of the correct body position (posture of the back).
Move arms to the side in opposite directions while standing
Power
Individual work
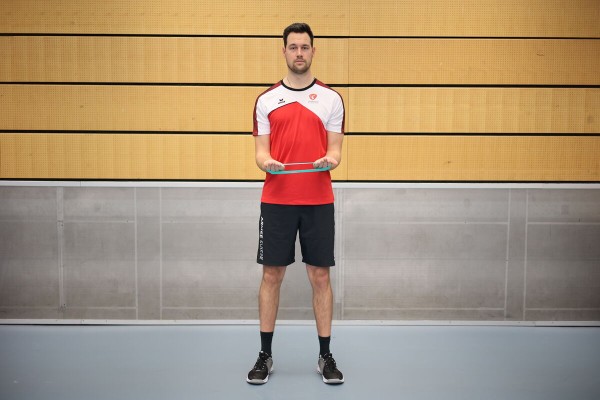
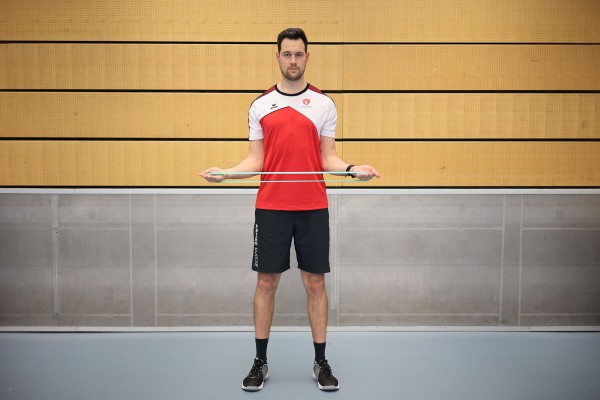
Stand upright, shoulder-width apart, upper arms close to the body, forearms pointing forwards (90 degree angle at the elbow joint), palms facing upwards. An elasticated band is stretched between the arms (place the band around the hands). From this position, move the forearms away from the body to the respective side (external rotation of the shoulders) to further stretch/tension the elastic band. Then bring your arms back to the starting position.
Attention:
The movement takes place in the forearms, while the upper arms remain stable.
Lighten:
Select an elastic band with less resistance.
Harden:
Select an elastic band with greater resistance.
1 mini-band
Move arms to the side in opposite directions while standing
Power
Individual work
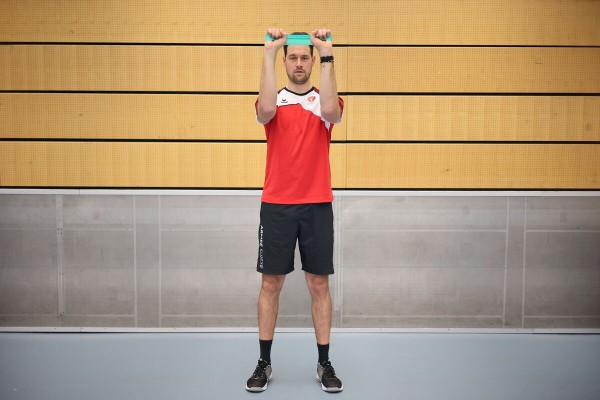
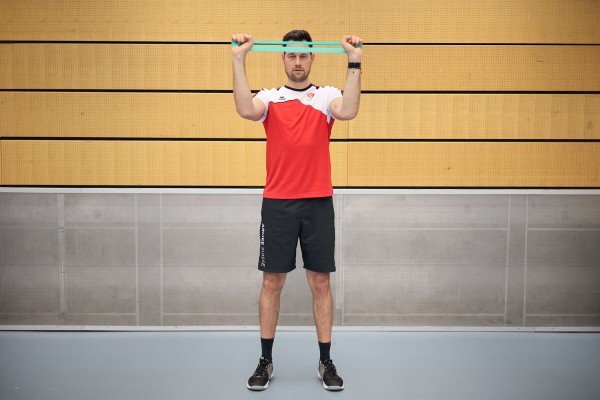
Stand upright, shoulder-width apart, upper arms pointing forwards at shoulder height, forearms pointing upwards (90 degree angle at the elbow joint), with the palms facing forwards (in the direction of gaze). An elasticated rubber band is held in the hands. From this position, move the bent arms away from the body to the respective side (external rotation of the shoulders) to further stretch/tension the elastic band. Then bring your arms back to the starting position.
Attention:
The angle of the elbow joint remains stable, the movement takes place in the shoulders.
Lighten:
Choose an elastic band with less resistance.
Harden:
Choose an elastic band with greater resistance.
1 mini-band
Move arms to the side in opposite directions while standing ► pull apart
Power
Individual work
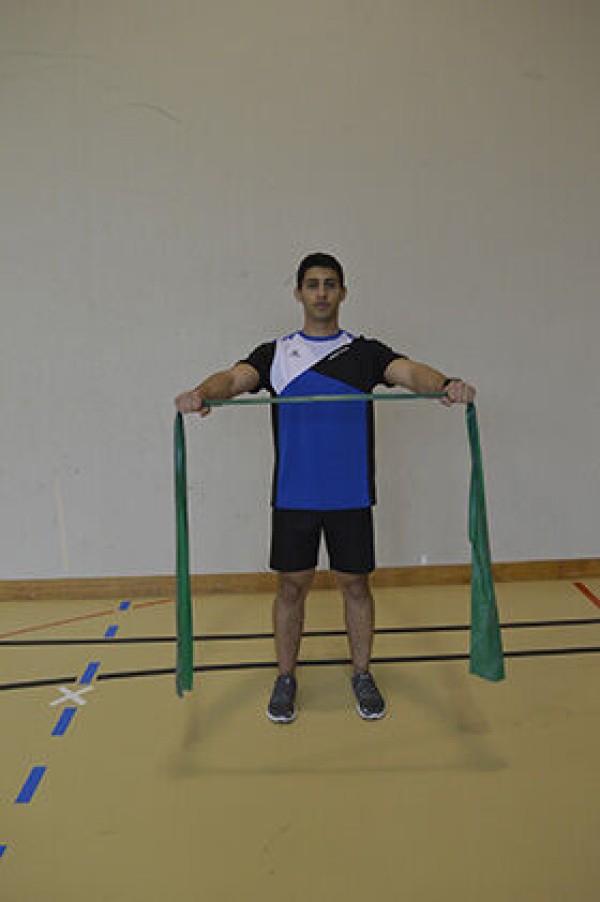
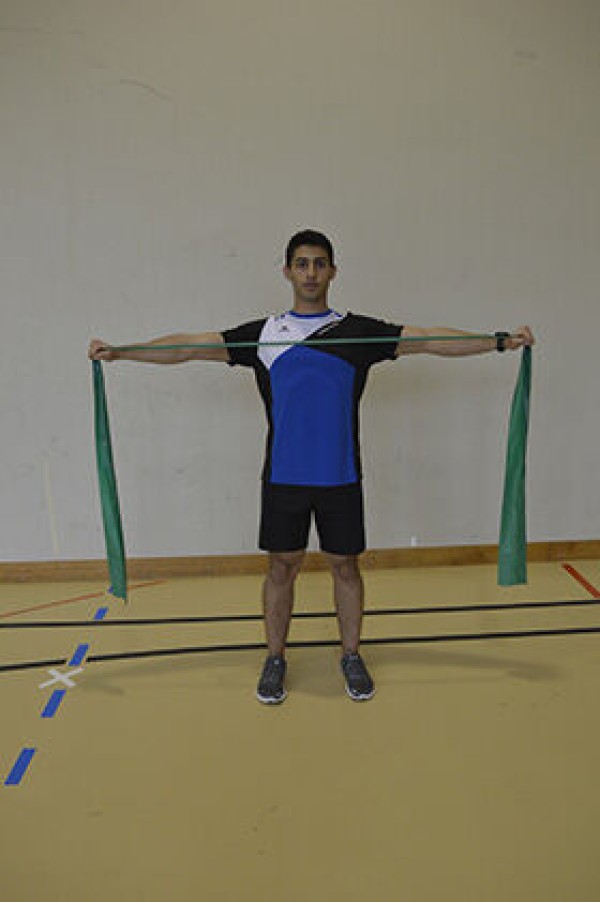
Stand upright, shoulder-width apart, arms outstretched at shoulder height in front of you, arms stretched horizontally forwards (front hold), hands holding the elastic band shoulder-width apart in front of your body, arms open/spread out to the sides (T-position of the body; shoulder blades together) and return to the starting position.
Attention:
Do not arch your back (tighten your stomach).
Lighten:
Select an elasticated band with less resistance.
Harden:
Select a rubber band with greater resistance.
Variant I:
Raise your arms sideways upwards (above your shoulders) or downwards (below your shoulders).
Variant II:
Alternately fix one arm in front and move the other arm to the side and back to the starting position (alternatively in an arching movement).
1 elasticated rubber band
Move your arms to the side in opposite directions while standing ► reverse fly
Power
Individual work
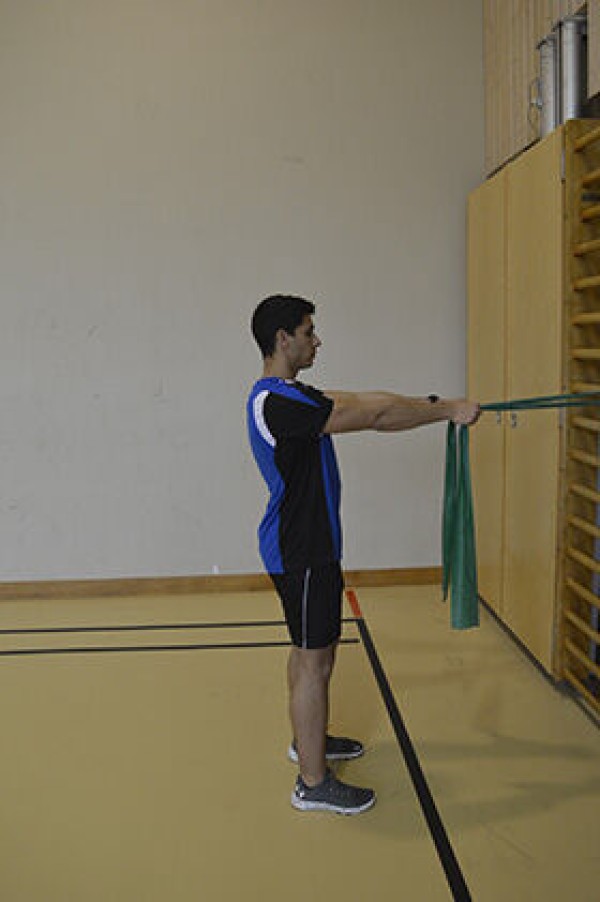
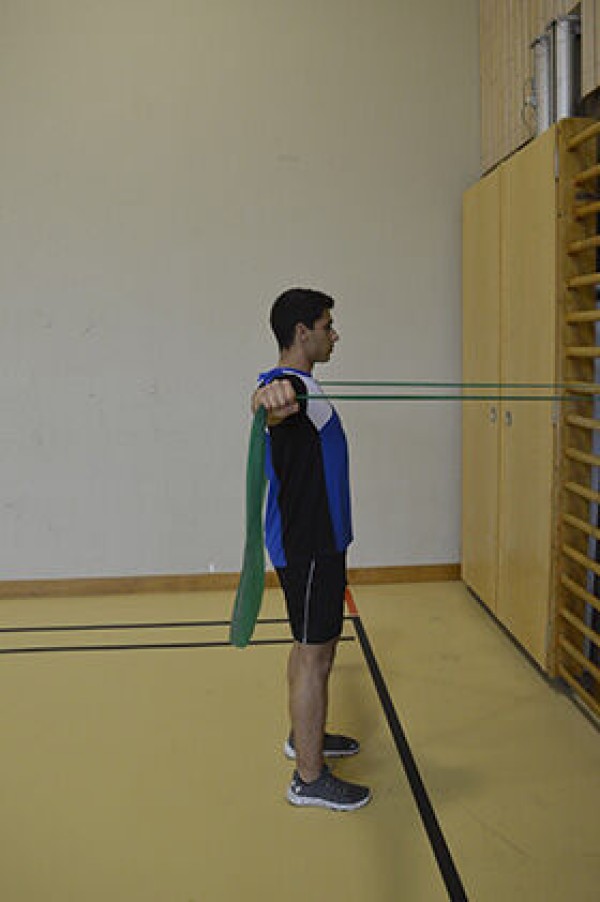
Stand with a light step or upright, shoulder-width apart in front of the wall bars (or a tree, for example), fix the elastic band at shoulder height on the wall bars (on the tree), stretch your arms out horizontally forwards (hold in front of you), open your arms/spread them out to the sides (T-position of the body; pull your shoulder blades together) and return to the starting position.
Attention:
Do not arch your back (tense your stomach).
Lighten:
Choose a rubber band with less resistance.
Harden:
Choose a rubber band with more resistance.
Variant I:
Lift your arms sideways upwards (above shoulders) or downwards (below shoulders).
Variant II:
Alternately fix one arm in front and move the other arm to the side and back to the starting position (alternatively in an arching movement).
1 elasticated rubber band
1 wall bar/tree
Move arms to the side in opposite directions while standing ► reverse fly
Power
Individual work
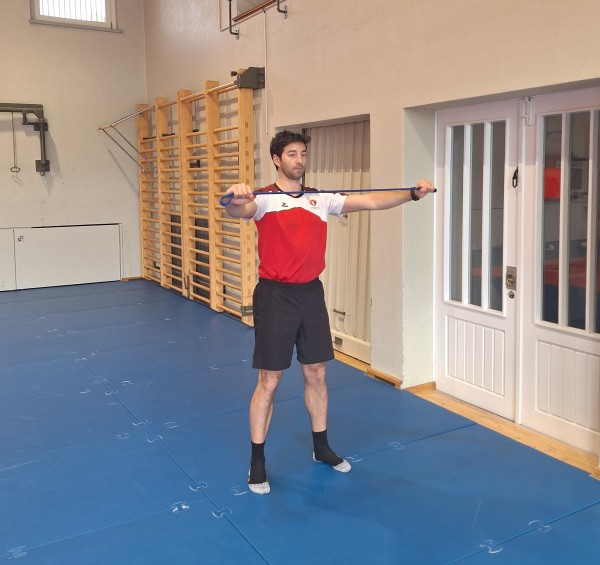
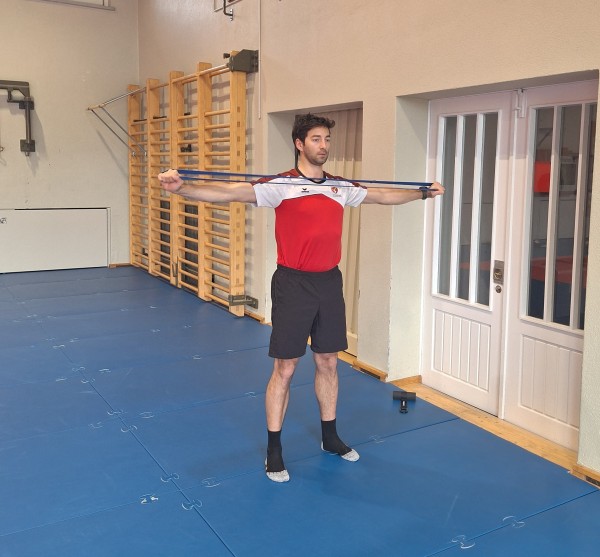
Stand upright shoulder-width apart, arms outstretched at shoulder height in front of you, grasp one end of the band with each hand (stretch an elasticated rubber band between your arms), backs of hands pointing upwards away from the floor. From this position, open your arms/spread them out to the sides (pull your shoulder blades together) and return to the starting position.
Lighten:
Select an elastic band with less resistance.
Harden:
Select an elastic band with greater resistance.
1 elasticated rubber band
Move your arms to the side in opposite directions while standing ► reverse fly
Power
Individual work
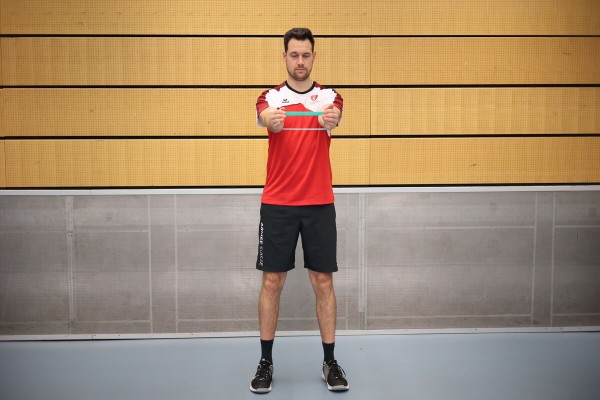
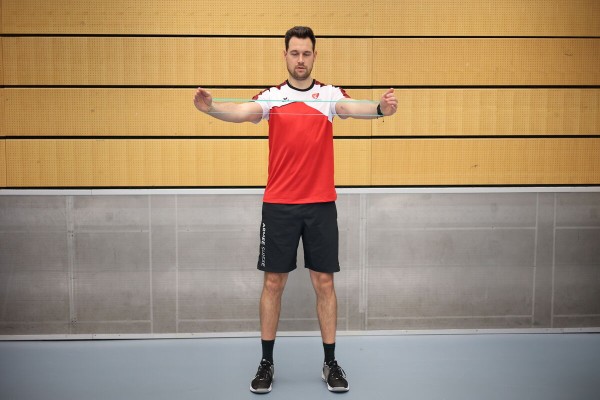
Stand upright shoulder-width apart, arms stretched out in front of you at shoulder height, backs of hands pointing away from the body to either side, an elasticated rubber band is stretched between the arms (place the band around the backs of the hands). From this position, open the arms/spread them out to the sides (pull the shoulder blades together - retraction/outward rotation of the shoulders) and return to the starting position.
Lighten:
Select an elastic band with less resistance.
Harden:
Select an elastic band with greater resistance.
1 mini-tape
Move your arms to the side in opposite directions while standing ► reverse fly
Power
Individual work

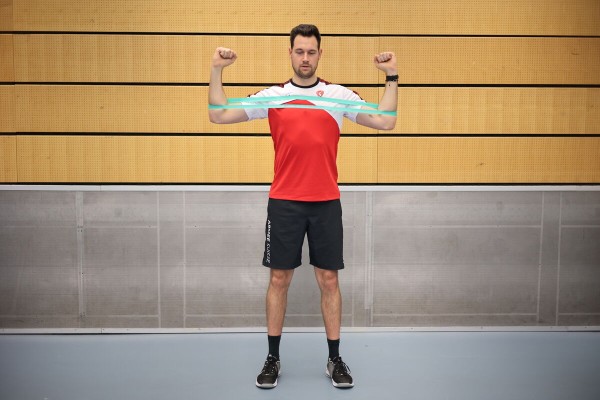
Stand upright with your feet shoulder-width apart, arms bent in front of you (elbows at chest height, 90 degree angle at the elbow joint so that your upper arms are pointing forwards and forearms are pointing vertically upwards), stretch an elasticated band between your arms (place the band around your forearms slightly above your elbows). From this position, open the arms/spread them out to the sides (pull the shoulder blades together - retraction/outward rotation of the shoulders) and return to the starting position.
Lighten:
Select an elastic band with less resistance.
Harden:
Select an elastic band with greater resistance.
1 mini-band
Move your arms to the side in the supine position ► fly
Power
Individual work
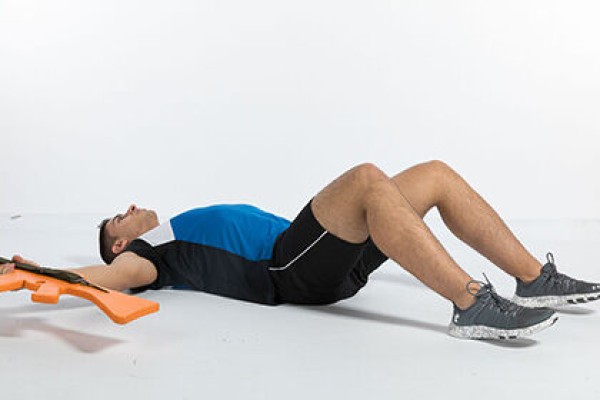
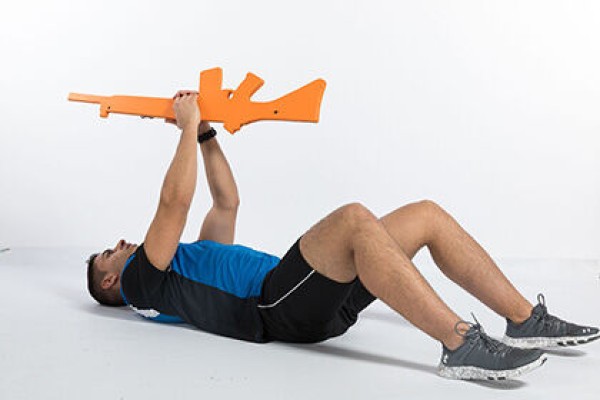
Back position with bent legs, arms stretched out to the side, hold the weapon in one hand on the hand guard, transfer the weapon from one hand to the other by simultaneously raising the arms to the pointing position (vertically upwards), then lower the arms back to the starting position.
Attention:
Do not lower your arms completely (constant tension).
Lighten:
Lower your arms less.
1 assault rifle (neutralised)
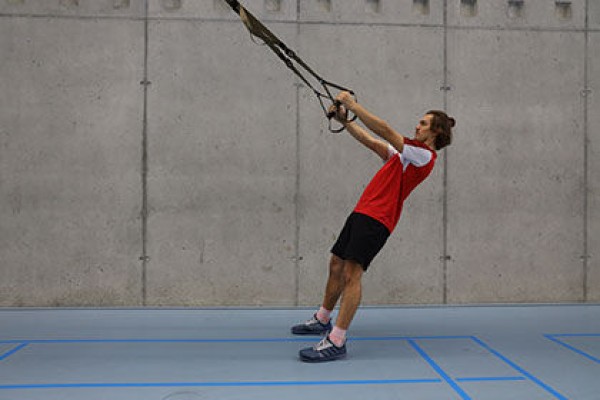
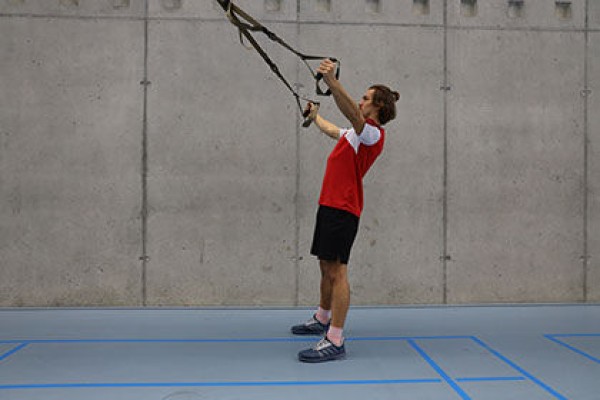
Move your arms to the side in opposite directions in a stepping position ► reverse fly
Power
Individual work
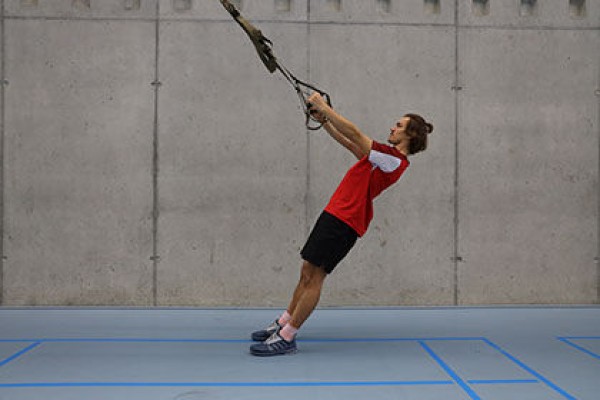
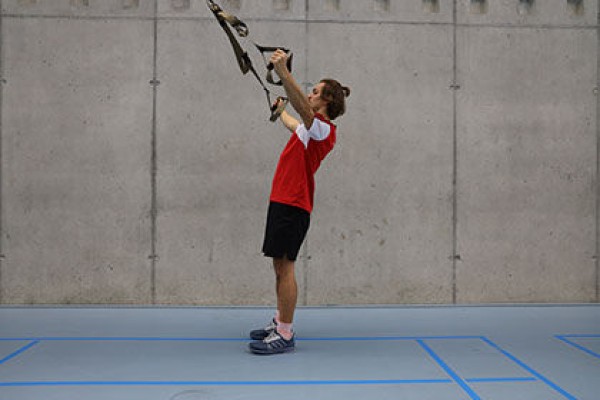
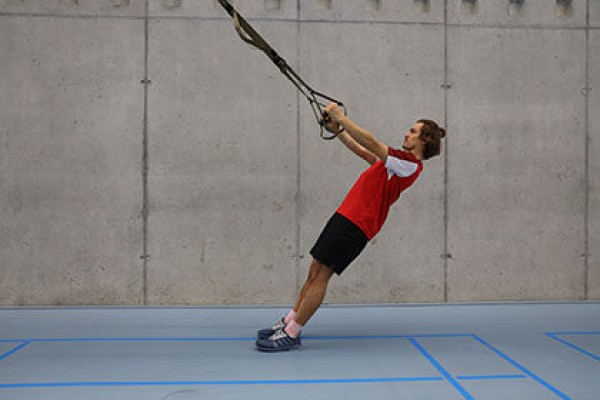
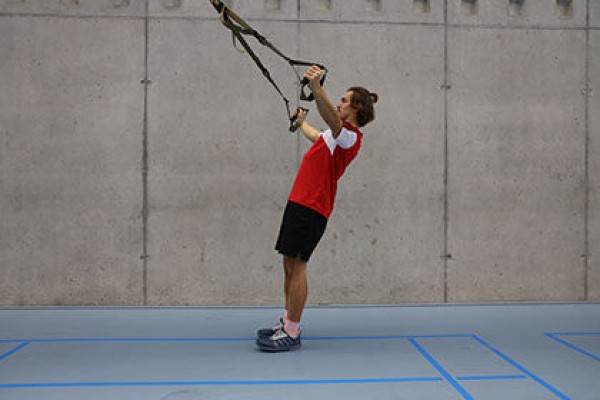
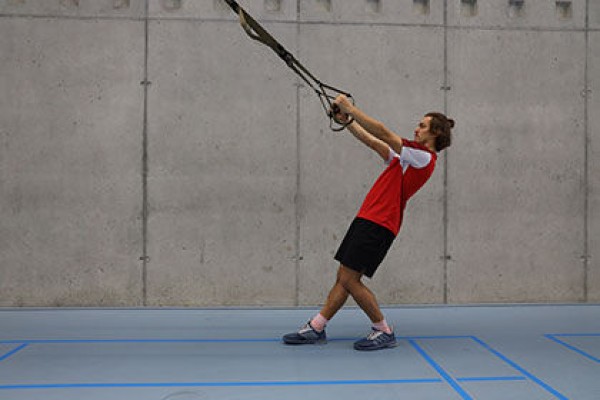

Progression I:
Set the sling trainer to a medium length, stand in an upright position facing the sling trainer, stretch your arms out to the side (shoulder height), lean back and slowly move your outstretched arms forwards, return to the starting position by pulling your upper body forwards (move your arms to the side), shifting your weight from the back leg to the front leg. After half the repetitions/time, change the standing leg (possibly organisation = 2 exercises, train both sides).
Progression II:
Analogue progression I, but only with slightly offset feet.
Progression III:
Analogue progression I, but with parallel feet (slightly wider than shoulder width).
Progression IV:
Analogue progression III, but with closed feet.
Attention:
Keep body tension, do not let hips sag (for all progressions).
Harden:
The more horizontal the starting position, the more challenging the exercise.
Variant:
Alternate arms in a T and Y position (horizontally and sideways upwards).
1 sling trainer
Move your arms backwards while standing ► pull down
Power
Individual work
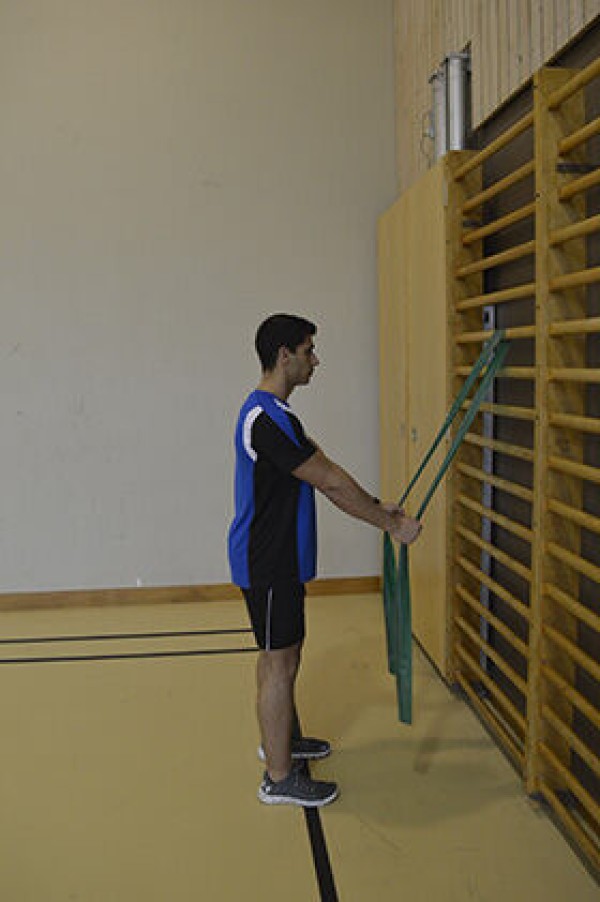
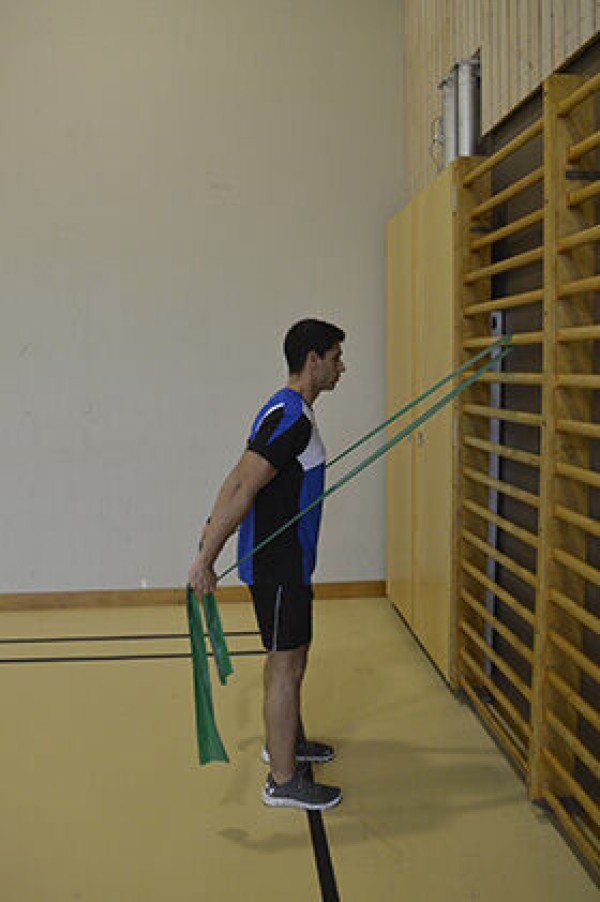
Step stance or shoulder-width stance facing the wall bars (or a tree, for example), fix the elastic band at shoulder height on the wall bars (on the tree), upper body slightly bent forward, arms stretched diagonally forwards/downwards, stretched arms behind the body (pulling the shoulder blades together) and return to the starting position.
Attention:
Keep your upper body stable.
Lighten:
Choose a rubber band with less resistance.
Harden:
Choose a rubber band with more resistance.
1 elasticated rubber band
1 wall bar/tree
Move arms backwards/downwards while standing ► pull down
Power
Individual work
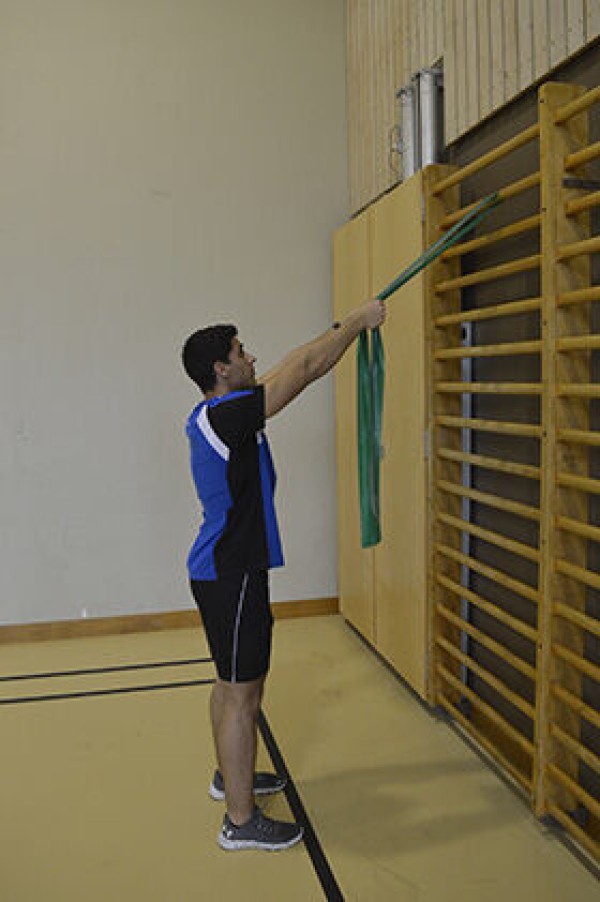
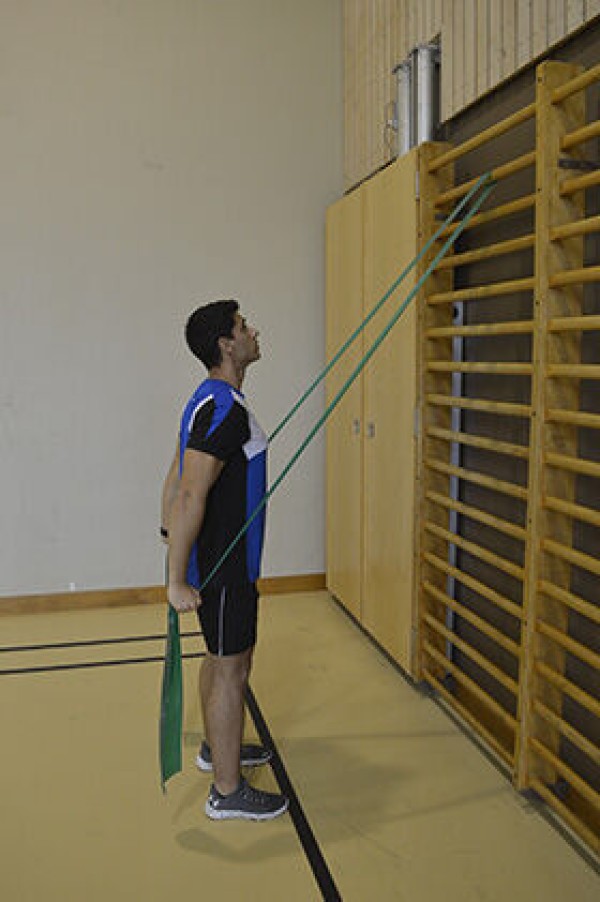
Stand with a light step or upright, shoulder-width stance facing the wall bars (or a tree, for example), fix the elastic band slightly above head height on the wall bars (on the tree), stretch your arms out diagonally upwards (hands at eye level), bring your outstretched arms down behind your body and back to the starting position.
Attention:
Do not arch your back (tighten your stomach).
Lighten:
Select a rubber band with less resistance.
Harden:
Select a rubber band with greater resistance.
1 elasticated rubber band
1 wall bar/tree
Move your arms upwards while standing ► shoulder press
Power
Individual work
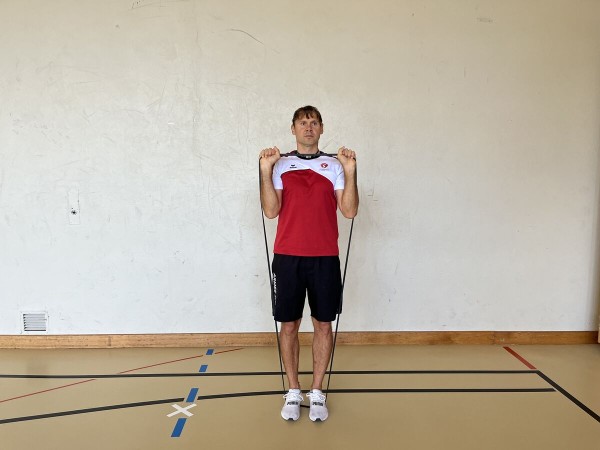

Stand upright, shoulder-width apart in the centre of the elastic band, with your hands gripping the band at chest height (backs of hands pointing towards your face), elbows of bent arms pointing downwards, arms stretched straight up next to your ears and bent back to the starting position.
Attention:
Do not arch your back (tighten your stomach).
Lighten:
Choose a rubber band with less resistance.
Harden:
Choose a rubber band with more resistance.
Variant:
Step with your front foot on the centre of the band.
1 elasticated rubber band
Move arms upwards with rotation of the upper body in half kneeling position (left) ► cable chop / wood chop / cable upward woodchop
Power
Individual work
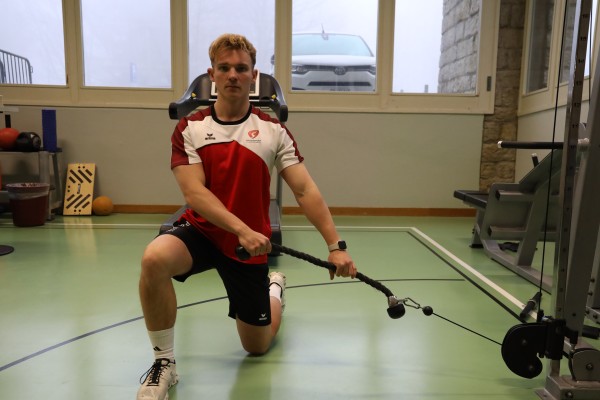

Half kneeling position with the upper body straight and the left knee on the floor (cable pulley side). The cable is positioned to the side of the body at approximately the height of the standing leg (appropriate distance). The cable is attached at the bottom. Hold the rope with your arms practically stretched out next to your body (cable pulley side) at about shoulder width. The arms should be pointing downwards at an angle of approximately 45 degrees. From this position, rotate your arms diagonally upwards over your shoulders to the other side of your body.
Attention:
Keep your upper body upright and your torso tensed. Do not put your weight down at any time to keep the tension high.
Lighten:
Less weight.
Harden:
More weight.
Variant:
Changing the aid: Grasp the one-handed handle with both hands.
1 weight tower/machine ► cable pulley (deep)
Move arms upwards with rotation of the upper body in half kneeling position (left) ► wood chop / upward woodchop
Power
Individual work
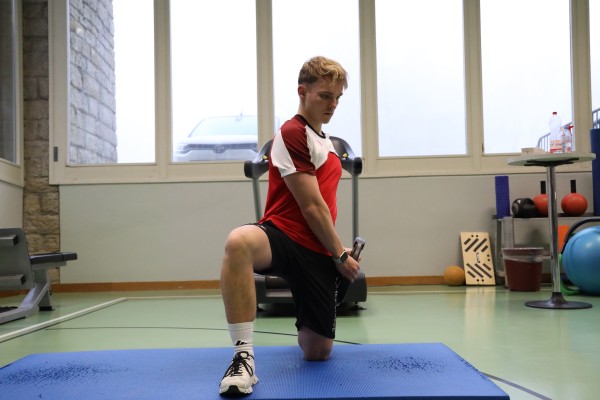
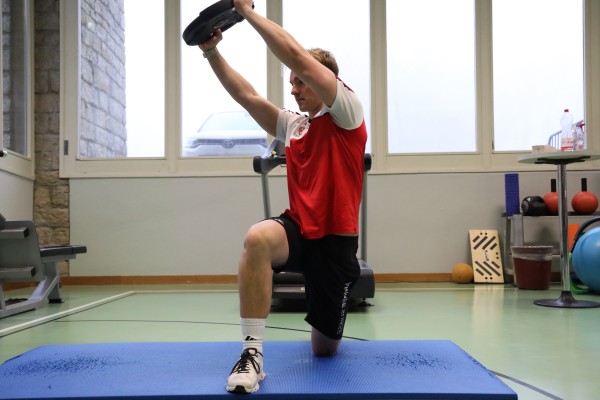
Half kneeling with the upper body straight and the left knee on the floor. Grasp the weight (weight plate, dumbbell or kettlebell) with your arms practically straight beside your body. The arms should be pointing downwards at an angle of approximately 45 degrees so that the weight is next to the hip of the kneeling leg. From this position, bring the practically stretched arms over the shoulder to the other side of the body with the torso rotating diagonally upwards.
Attention:
Keep your upper body upright and your torso tensed.
Lighten:
Less weight.
Harden:
More weight.
Variant:
Perform the exercise with one arm.
1 weight disc/dumbbell/kettlebell
Move arms upwards with rotation of the upper body in half kneeling position (right) ► cable chop / wood chop / cable upward woodchop
Power
Individual work
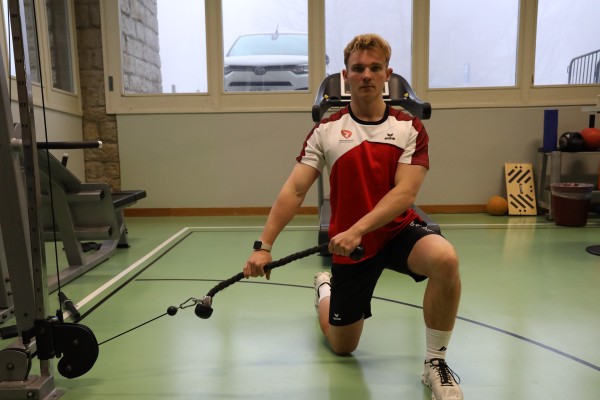
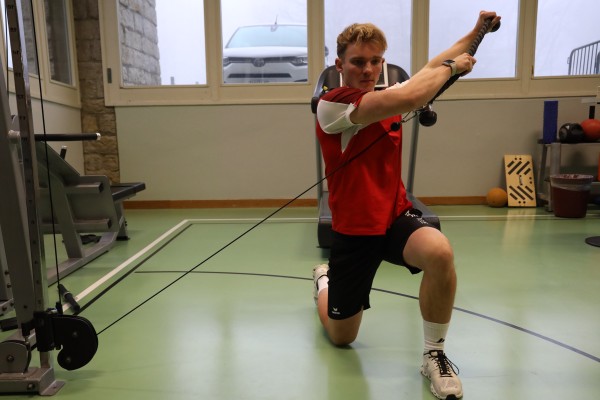
Half kneeling position with the upper body straight and the right knee on the floor (cable pulley side). The cable is positioned to the side of the body at approximately the height of the standing leg (appropriate distance). The cable is attached at the bottom. Hold the rope with your arms practically stretched out next to your body (cable pulley side) at about shoulder width. The arms should be pointing downwards at an angle of approximately 45 degrees. From this position, rotate your arms diagonally upwards over your shoulders to the other side of your body.
Attention:
Keep your upper body upright and your torso tensed. Do not put your weight down at any time to keep the tension high.
Lighten:
Less weight.
Harden:
More weight.
Variant:
Changing the aid: Grasp the one-handed handle with both hands.
1 weight tower/machine ► cable pulley (deep)
Move arms upwards with rotation of the upper body in half kneeling position (right) ► wood chop / upward woodchop
Power
Individual work

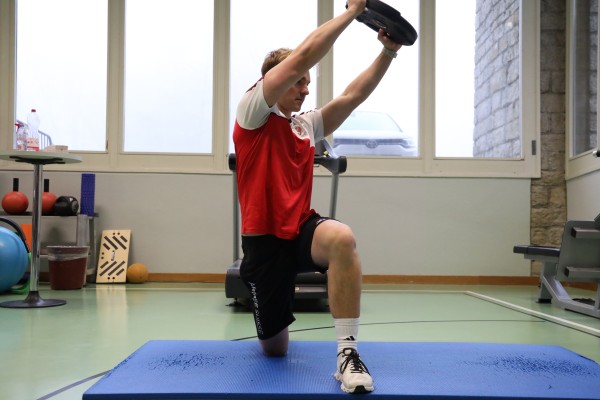
Half kneeling with the upper body straight and the right knee on the floor. Grasp the weight (weight plate, dumbbell or kettlebell) with your arms practically straight beside your body. The arms should be pointing downwards at an angle of approximately 45 degrees so that the weight is next to the hip of the kneeling leg. From this position, bring the practically stretched arms over the shoulder to the other side of the body with the torso rotating diagonally upwards.
Attention:
Keep your upper body upright and your torso tensed.
Lighten:
Less weight.
Harden:
More weight.
Variant:
Perform the exercise with one arm.
1 weight disc/dumbbell/kettlebell
Move arms downwards with rotation of the upper body in half kneeling position (left) ► cable chop / wood chop / cable downward woodchop
Power
Individual work
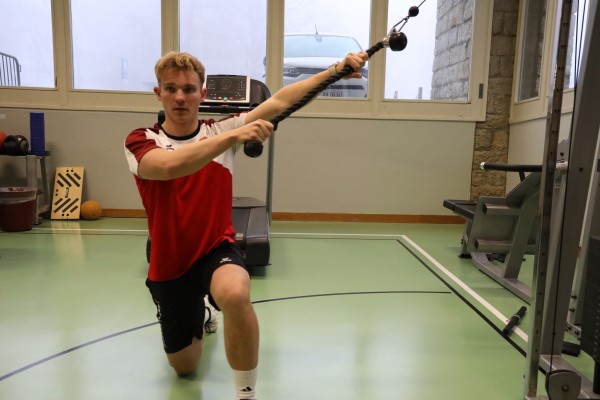
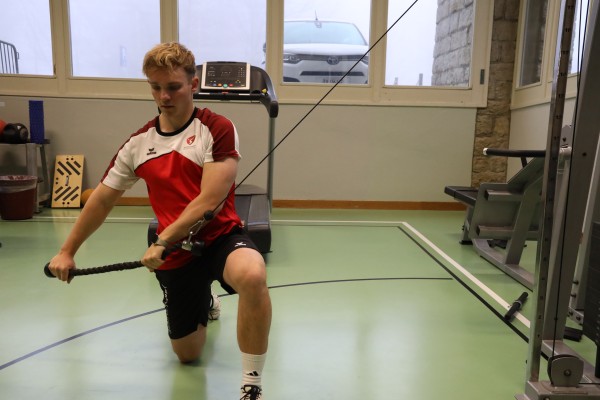
Half kneeling position with the upper body straight and the left knee on the floor (cable pulley side). The cable pull is positioned to the side of the body at approximately the height of the supporting leg (appropriate distance). The cable pull is attached at the top. Hold the rope with your arms practically stretched out next to your body (cable pulley side) at about shoulder width. The arms should be pointing diagonally upwards (at an angle of approximately 45 degrees). From this position, rotate your arms diagonally downwards over your shoulders to the other side of your body at hip level.
Attention:
Keep your upper body upright and your torso tensed. Do not put your weight down at any time to keep the tension high.
Lighten:
Less weight.
Harden:
More weight.
Variant:
Changing the aid: Grasp the one-handed handle with both hands.
1 weight tower/machine ► cable pulley (high)
Move arms downwards with rotation of the upper body in half kneeling position (right) ► cable chop / wood chop / cable downward woodchop
Power
Individual work
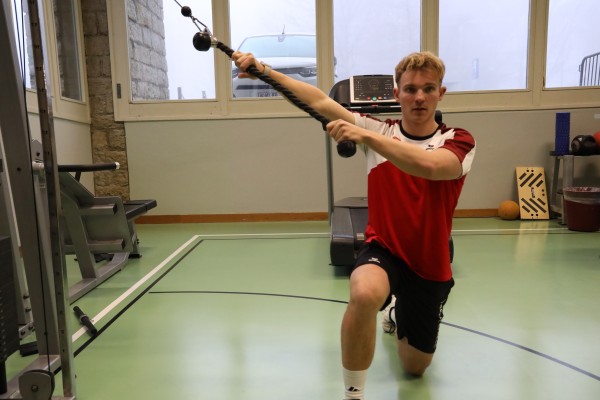
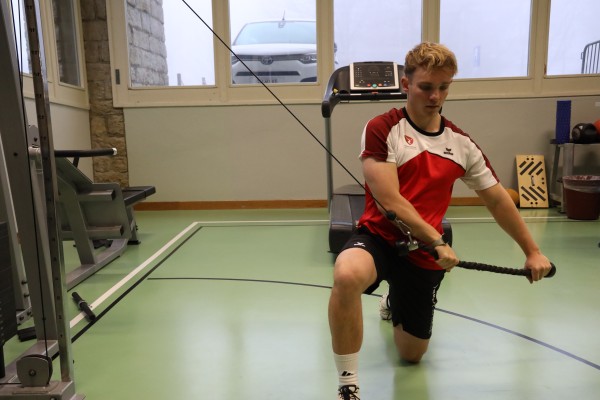
Half kneeling position with the upper body straight and the right knee on the floor (cable pulley side). The cable pull is positioned to the side of the body at approximately the height of the supporting leg (appropriate distance). The cable pull is attached at the top. Hold the rope with your arms practically stretched out next to your body (cable pulley side) at about shoulder width. The arms should be pointing diagonally upwards (at an angle of approximately 45 degrees). From this position, rotate your arms diagonally downwards over your shoulders to the other side of your body at hip level.
Attention:
Keep your upper body upright and your torso tensed. Do not put your weight down at any time to keep the tension high.
Lighten:
Less weight.
Harden:
More weight.
Variant:
Changing the aid: Grasp the one-handed handle with both hands.
1 weight tower/machine ► cable pulley (high)
Bring your arms in front of your body while standing (left) ► internal rotation
Power
Individual work
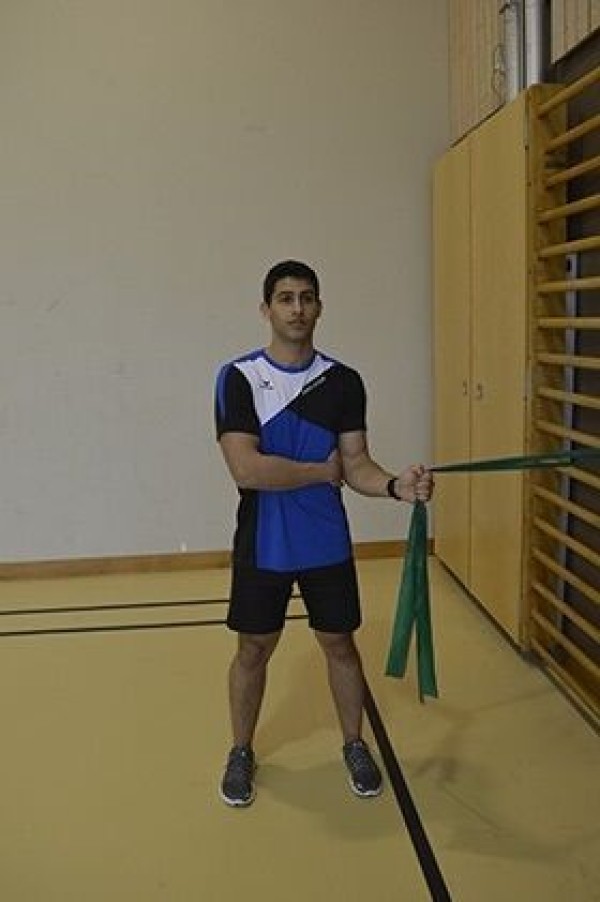
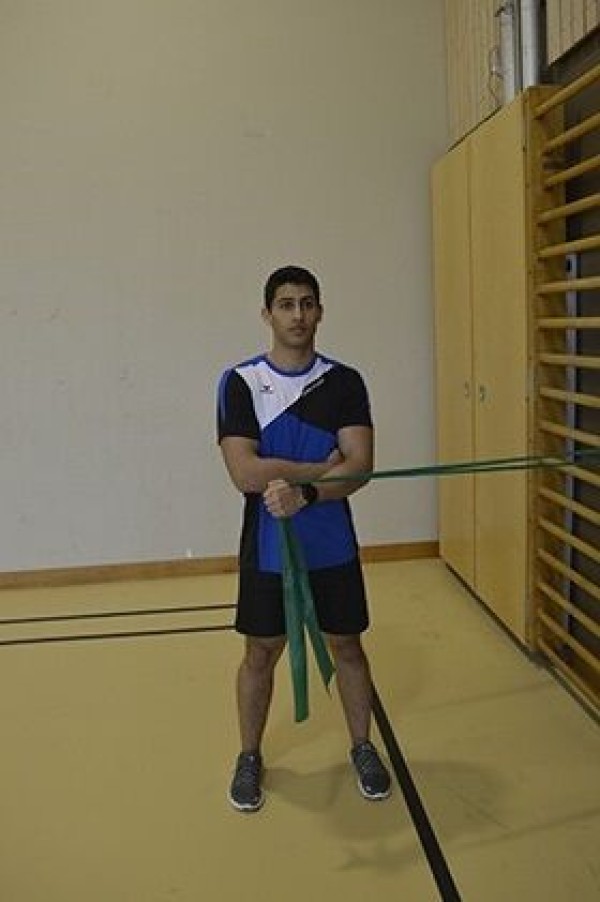
Attach the elastic band to the wall bars (or a tree, for example) at stomach height, stand shoulder-width apart (90 degree angle) to the wall bars (to the tree), arms stretched out towards the wall bars (tree) (to the left), grasp the elastic band with both hands, bring the stretched arms in front of the body at shoulder height and back to the starting position, keeping the upper body stable.
Attention:
No torso rotation, the movement only takes place in the shoulder joint.
Lighten:
Choose an elastic band with less resistance.
Harden:
Choose an elastic band with greater resistance.
1 elasticated rubber band
1 wall bar/tree
Bring your arms in front of your body while standing (right) ► internal rotation
Power
Individual work
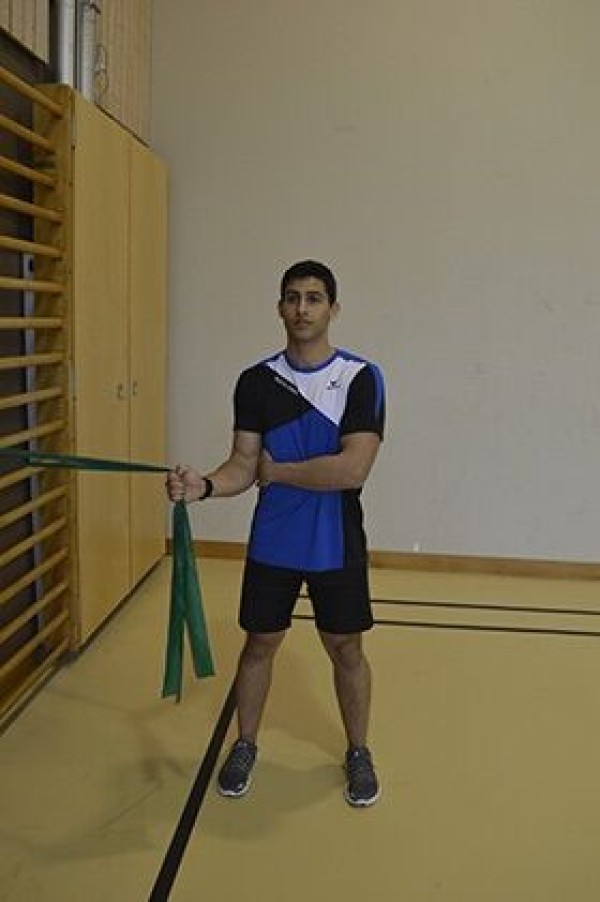
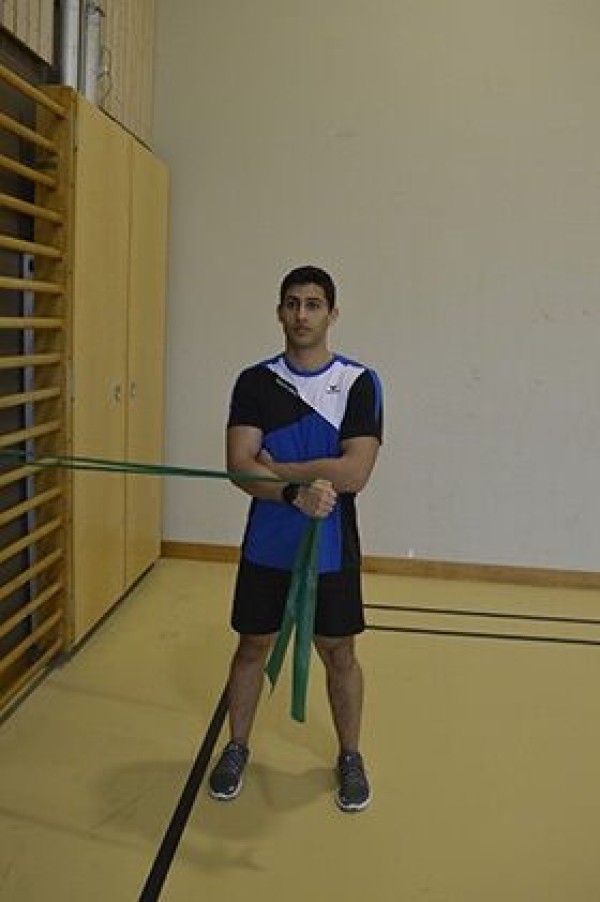
Attach the elastic band to the wall bars (or a tree, for example) at stomach height, stand shoulder-width apart (90 degree angle) to the wall bars (tree), arms stretched out towards the wall bars (tree) (to the right), grasp the elastic band with both hands, bring the stretched arms in front of the body at shoulder height and back to the starting position, keeping the upper body stable.
Attention:
No torso rotation, the movement only takes place in the shoulder joint.
Lighten:
Choose an elastic band with less resistance.
Harden:
Choose an elastic band with greater resistance.
1 elasticated rubber band
1 wall bar/tree